Start your Wave RFiD Inventory Management journey here!
So you might be wondering what is Wave?
SimplyRFiD Wave is an iOS app that was developed to increase inventory efficiency and accuracy.
The aim of this guide is to show you how easy it is to use Wave. We can break it down in 4 easy steps!
- Tag items using our Quick Tag feature
- Scan and save your inventory in Wave.
- Synchronize all your handhelds to SimlpyRFiD Pogi so you can start your audit.
- Unify your inventory, download it, and start reconciling your actual inventory count to your chosen ERP system.
Now that you have an idea on how easy it is to use Wave, let's get started by downloading our Wave Quick Start Guide in this link: SimplyRFiD Wave Quick Start Guide
Once you've received all the items you need to get started, you can now start tagging. It is fairly easy:
- Stick an RFID tag to your item
- Commission the item to your inventory using the Quick Tag function
- Hit Save
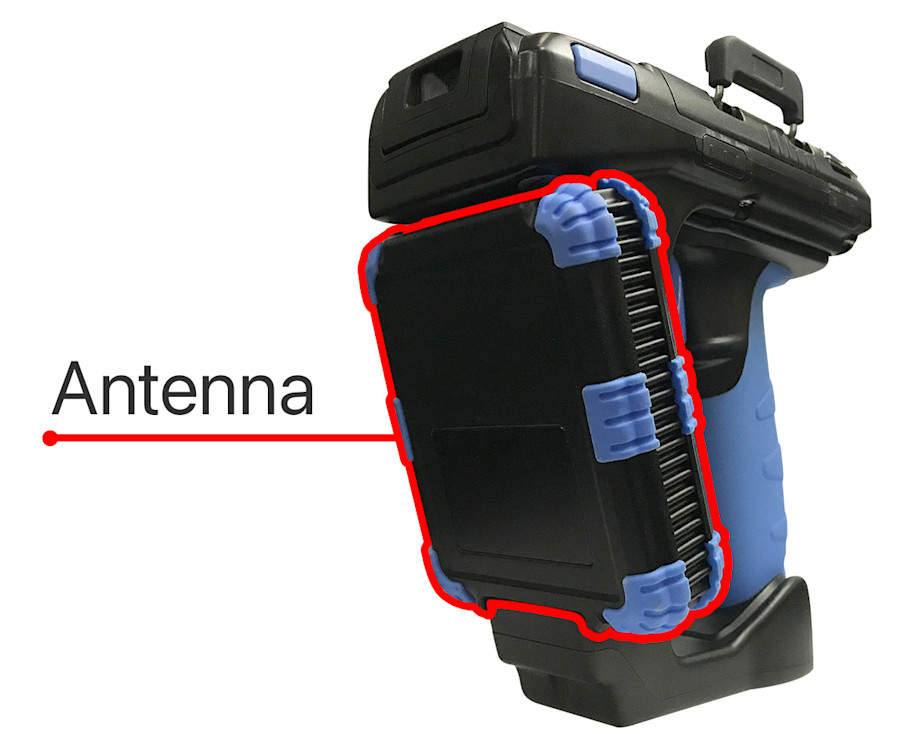
Pro-tip: when you're scanning or commissioning RFiDs you want to make sure that you are pointing the reader area to the vicinity of the RFiD label. The image below is where the RFiD reader antenna is situated.
To learn more about setting up Wave and tagging items, please visit these articles.
When you're done commissioning all your items using Wave, you can now start scanning your inventory. Here's how to easily count your inventory:
- Go to Inventory tab in Wave.
- Select the Location of the items you want to scan.
- Pull the trigger.
- When you're done scanning items, hit Save.
Here are some best practices when taking your inventory.
After you've taken inventory of all your locations, you want to synchronize all the inventories that was saved from different locations into Pogi. How to do that? Here are the steps below:
- Login to Pogi.
- Go to Audit Report.
- Check if the reports are what you expect as the items Found and Missing.
- When you're happy with the report, go the Current Page.
- You'll see all the recent items that were inventoried and you can feel free to audit the items there or export it into a CSV file to do you audit in a spreadsheet.
Here are some ways you can manage your users, locations and groups using Pogi.
In this last step, we'll give you the easiest way on how you can reconcile your inventory count to your ERP or PoS system. There are many ways out there that involves using our API, but if you'd also like to keep it simple and easy, just follow these steps below:
- Log-in to Pogi.
- Go to Current page.
- Export the assets you wanted to upload into your ERP system.
Now, you can use that downloaded .CSV or .JSON file to upload to your ERP system.
For additional reading materials or if you want to look at our API manuals, you can go here.
If you want to take a look at case studies of how our clients have implemented an RFiD inventory system, you can read our How To's.
Should you be having technical troubles, you can always go directly to our FAQ page or contact our support team.
