SimplyRFID Wave and Pogi User Guide
This is the perfect place to start. Complete each step in this checklist to successfully complete your Wave Inventory Management Training.
Step 1: Setup and Configure Pogi
Please use the steps in the guide below to complete the following tasks:
- Log in to Pogi
- Configure your groups
- Configure your users
- Configure your locations
- Optional: Configure your data settings
Step 2: Configure Your Wave Handheld
Follow this Wave Quick Setup guide to install the CS108 handheld then follow these tasks to set up Wave:
- Install the battery in the handheld
- Download the Wave App
- Connect the handheld to your Wave App
- Connect the Wave app to your Pogi instance
- Optional: Configure your Wave settings
Step 3: Managing Your Inventory
This section will introduce you to the Pogi software and walk you through all the steps to configure the software.
What is Pogi?
The Pogi software is the database of all of your RFID information. It is a cloud-based system that stores all of the RFID numbers, locations, and asset information for everything in your warehouse or store.
You can access Pogi from any internet-connected device, and your Wave handheld. Any handheld you connect to your Pogi server will be able to share inventory data from any of your stores or warehouses.
Accessing Pogi
First things first, you’ll need to access the Pogi software to do anything.
- Open a web browser and navigate to: pogi.simplyrfid.com.
- At the login prompt, enter your username and password. If this is your first time logging in, you may have received an email from SimplyRFiD with your new login and password.

I forgot my password, or I never got it!
No problem. Just click the Forgot Password link and enter your email address.
If that doesn’t work, please get in touch with support@simplyrfid.com to help get your account recovered.
Configuring Groups
Once you’ve logged in, one of the first things you should do is manage your group settings.
The steps below will show you how to set up your groups. Groups will help you manage your users quickly and the locations they have access to.
What is a group?
The groups feature a way for you to organize a single or a set of people to handle a number of location/s. This way, you can group location/s and user/s the way you need.
Creating Groups
These steps will walk you through the creation of new groups.
- Click the menu button to expand the section of Pogi.
- Go to groups.
- Click Add Group.
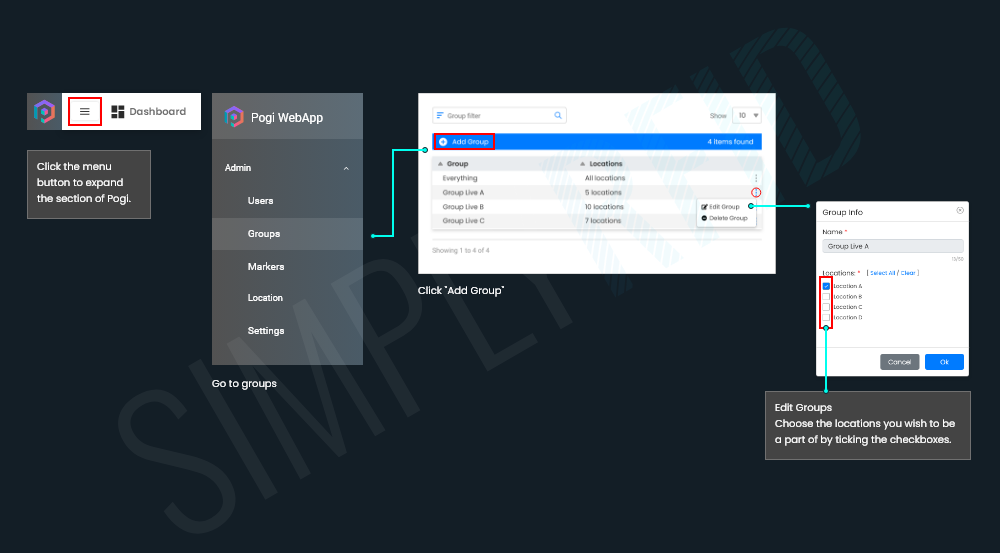
Editing Groups
- Click the menu button on the right side of the group list, next to the Group you want to edit.
- Now you can choose the locations you wish to be a part of by ticking the checkboxes. On the other hand, untick any boxes you don't want the Group to belong.
- Once you’re done selecting locations, click the OK button to save.
Removing Groups
- Before removing a group, ensure no users are associated with it. To remove a user from a group, see the Users section of this guide.
- Click the same three dots and proceed to Delete Group.
- Confirm and save.

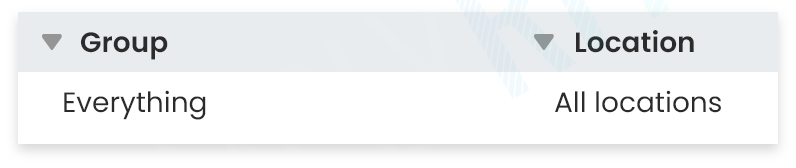
What is the ‘Everything’ Group?
The Everything group is the default setting of your Pogi instance. This means that any user within the Everything group will have visibility on the contents of any group.
Configuring Locations
After the group settings have been configured, it’s time to configure the location information in Pogi.
This section will guide you through the steps to configure the location settings in Pogi. Location settings are used to establish physical retail stores, warehouses, or offices. All inventory scans will be counted by location.
What is a Location?
Locations are logical zones used to track your assets. A location can be your entire warehouse, office, retail store, or even the name of a shipment or truckload. Ideally, a location should encompass inventory as a whole. It’s best not to break a single logical area into smaller areas like shelves or aisles. For more granular location functionality, see the section on Markers.
Creating Locations
Follow these steps in the Pogi web interface to create a new location:
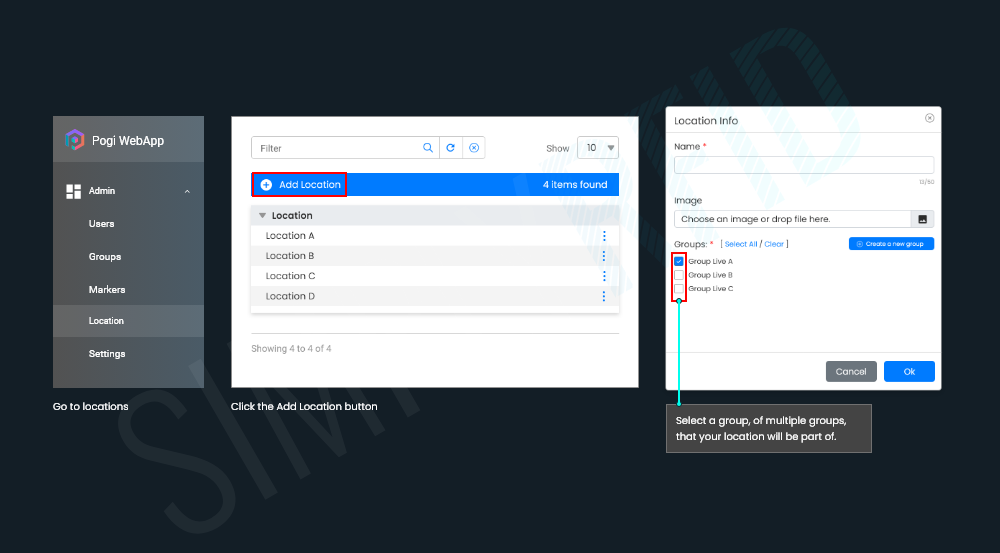
- Click on the Locations menu item.
- Click the Add Location button.
- Type the name of your location, and optionally, select an image to represent the location.
- Select a group, or multiple groups, that your location will be a part of. For more information about Groups, see the Group settings of this guide.
- Click the OK button to save your location.

Note: If no groups have been created yet, you can create a new group by clicking the Add Group button and typing a group name.
Removing Locations
Note: All of the items currently in that location must be moved to a different location to remove a location.
To remove items from a location follow these steps:
- Click on the Current tab in the navigation menu.
- Next, click the Advanced Filter option.
- Select the location you wish to remove in the Dropdown, then click the Apply button.
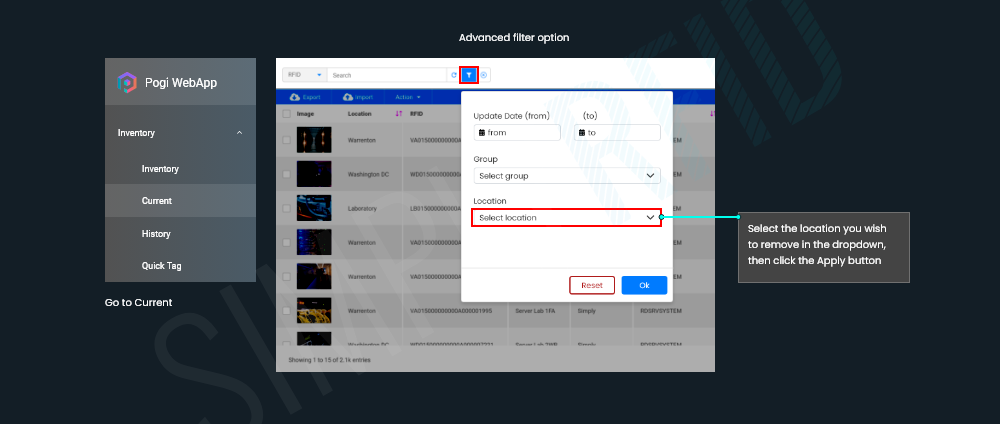
Note: All the items displayed on the page should have the same location listed in the Location column.
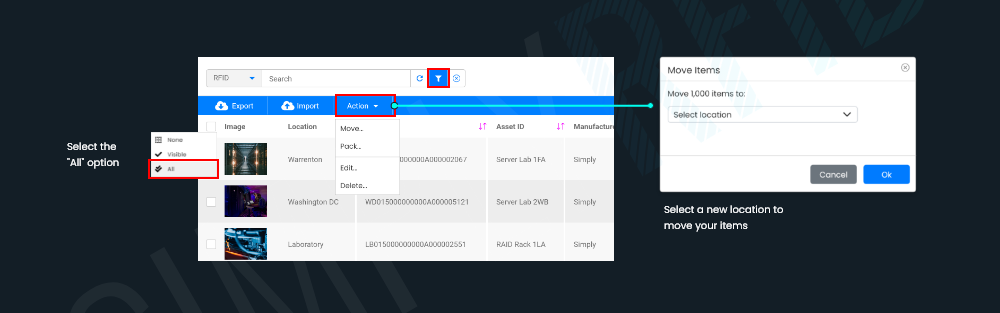
- Click the selection box and select the All option. This will select all the items found in the specified location.
- Click the Action dropdown and select the Move option.
- Select a new location to move your items and click the OK button to move all selected items to the new location.
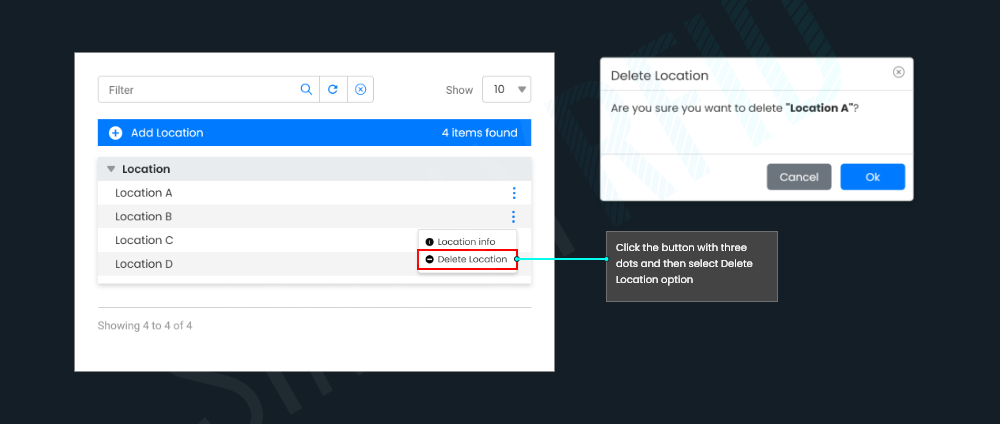
Once all the items have been moved to a new location, the original location may be deleted. To delete the location:
- Click on the Locations button in the navigation menu.
- Find your location in the list, click the button with three dots next to the location and then select the Delete Location option.
- When prompted, click the OK button to confirm.
Setting-up Users
This section will describe the steps to setting up and managing your users in Pogi.
Note: There is no limit to the number of users configured on a single Pogi instance.
What is a User?
A Pogi user is someone who is granted access to managing and maintaining your inventory. Users created in Pogi will also have access to the Wave Handheld app. Depending on their user access level, they can audit the inventory, manage other users, edit system settings such as location and groups, and produce reports.
Creating a User
These steps will walk you through the creation of new users.
- Click the menu icon (navigation icon) on the top left of the page, then click the Users menu item.
- Click the Add User button in the top left corner of the page.
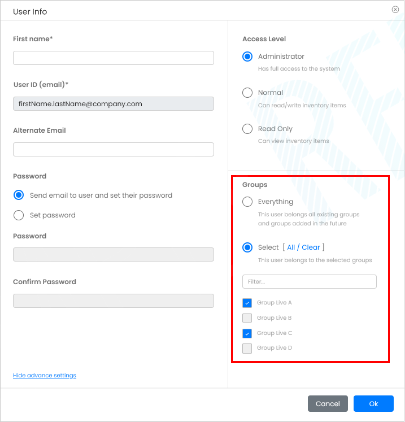
- Here is where you can set the user’s email address, default password, and name for the account. In addition, you can select the user’s Access Level and which Group they belong to.
- Once you are happy with the settings, please click OK.
- Finally, click OK to verify that the user account creation has been successful.
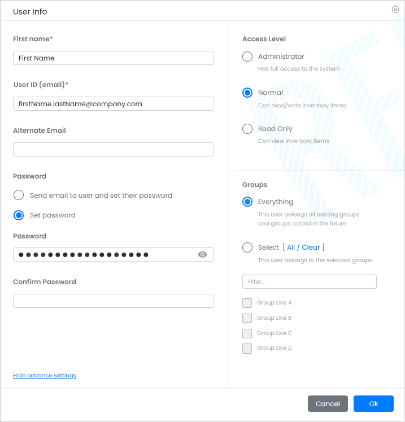
What is a user’s Access Level
There are three Access Levels available in the system.
- Administrator - the highest level granted to any user. Administrators are allowed to change, edit, and create data in Pogi, and manage other users and settings.
- Normal - these users can add new items through Pogi and Wave. They can also perform all import and export functions in Pogi. Normal users may edit any data except for other user data and settings.
- Read Only - these users cannot modify items inside Pogi. They are only allowed to view and filter items within the instance.
Sending New Users their Login Credentials
The first user of Pogi receives a Welcome Message from our Customer Service team. After which, any new users must receive their credentials from the Administrator who created their account.
Follow the steps below to send new users their credentials:
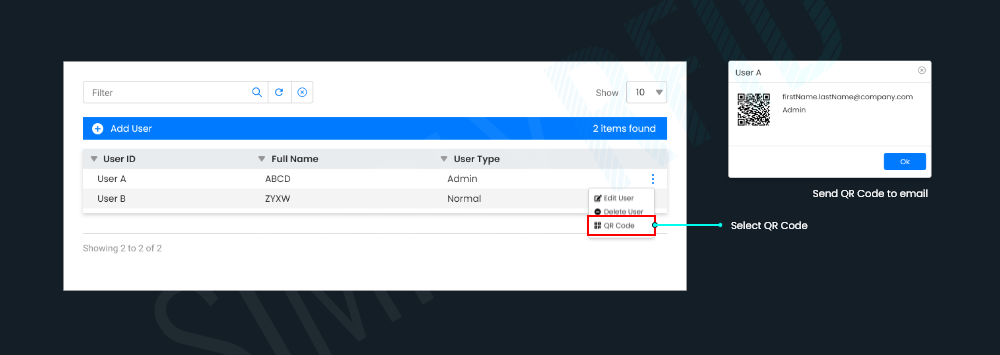
- Within Pogi’s User page, look for the User ID or Name of the user you created.
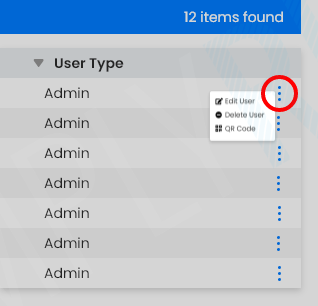
- At the far right of the row, click the action button (three vertical dots).
- Select QR Code.
- You can copy this image by right-clicking it and selecting Copy image.
- Paste the image into a new email and send it along with the user’s Pogi login credentials.
Adding a User to a Group
It is incumbent on any administrator of your Pogi instance to create Groups. With groups, you can limit users to specific work locations.
Once you have set up your groups, follow these steps to add users to a specific group:
- Within Pogi’s User page, look for the User ID or Name of the user you want to edit.
- Click the action button (three vertical dots) at the far right row, then select Edit User.
- Look for the Groups section.
- Select the individual groups this user will belong to or select the Everything group.
- Click OK once you are happy with the settings.
Editing a User
Follow the steps below to edit users:
- Within Pogi’s User page, look for the User ID or Name of the user you want to edit.
- Click the action button (three vertical dots) at the far right row, then select Edit User.
Removing a User
Follow the steps below to remove users:
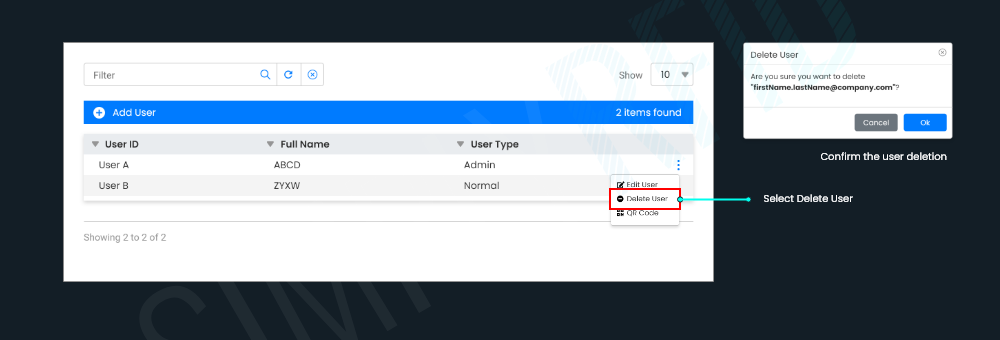
- Within Pogi’s User page, look for the User ID or Name of the user you want to delete.
- Click the action button (three vertical dots) at the far right row, then select Delete User.
- Click the OK button to confirm the user deletion.
This guide section provides simple steps to start using your new Wave RFID handheld reader quickly.
Please begin by checking the contents of this box. It should include the following:
- CS108 RFID Sled Handheld Reader
- CS108B Battery
- USB Type C to USB Type A cable
- This guide
Next, install the battery in your handheld:
- To access the battery compartment, remove the battery cover:
- To insert the battery pack into the battery compartment:
- The battery should be fully secured by the spring-loaded battery clip as shown.
- Replace the battery cover. Ensure that the locking tabs at the front of the battery cover are fully inserted into the slots.
- Fully rotate to close the metal latches to secure the battery cover in position.
Once the battery is installed, it is essential to fully charge the unit before using it the first time.
It takes approximately 4 hours to be fully charged. Connect the supplied USB Type C plug to CS108 and the Type A plug to the included USB charger. The RED charging LED will light. Charge the unit until the red light goes out.
For a detailed visual representation, kindly view our Wave Quick Start Guide.
Now it’s time to configure your iPhone
- First, scan this QR code using your iPhone to download the Wave app:
 Or you can search “SimplyRFiD Wave” in the app store to locate the Wave Enterprise app.
 - Once the Wave app is installed, enable Bluetooth by opening the Settings app and switching Bluetooth to On.
Note: Do not use the Bluetooth pairing screen to connect the CS108 to your iPhone, that step comes later.
- To power on CS108, press and hold the power button for 3 seconds and then release it. After that the GREEN LED will light up continuously.
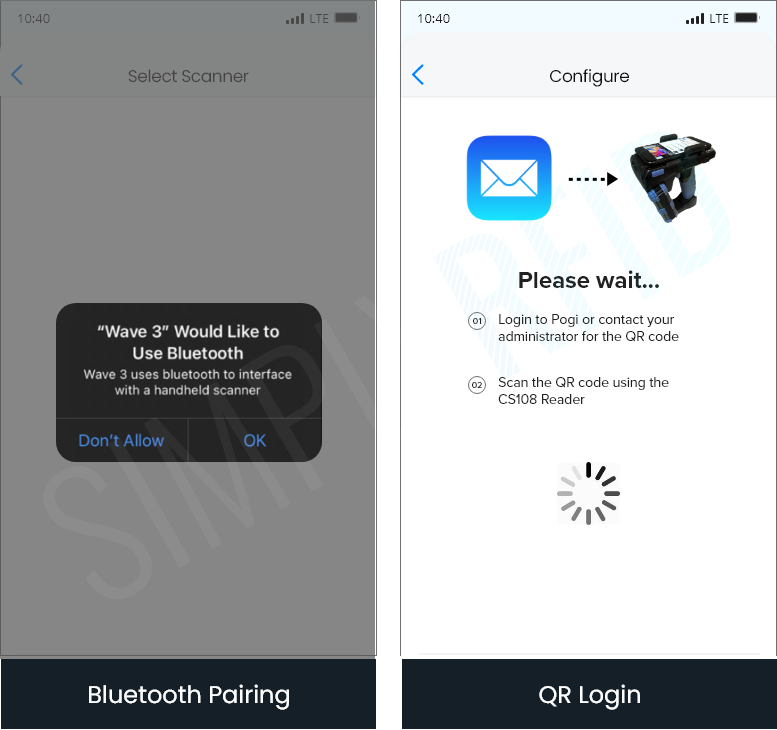
Finally, configure the Wave app
Tap on the Wave icon on your iPhone to launch the app. The first time the app runs, you will be prompted to connect to your scanner. If the scanner is powered on it will appear in the devices list. Identify your handheld by comparing your device's serial number to the number displayed on the screen.
You’ll be prompted to check your email for a QR code on the next screen. You’ll need to use the CS108 handheld to scan this code. Once the code is scanned the handheld will be ready to use!
This section talks about Wave's Advanced Settings.
HANDHELD INFORMATION
This page displays current information about your Handheld Settings. Below are the lists of functions you'll find on this page.
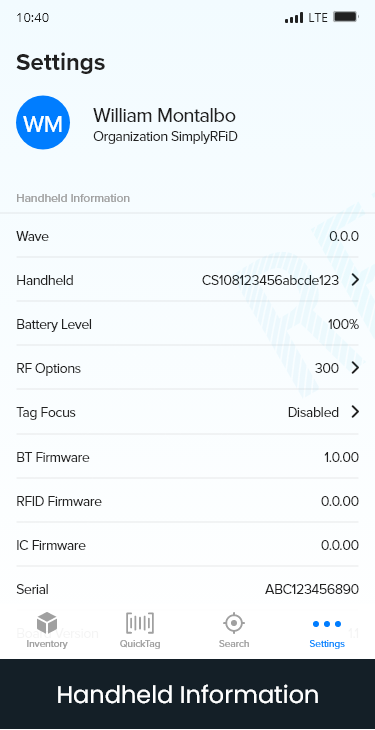
WAVE
This section displays the current version of the app you have. As of date, you should have version 3.3.6
HANDHELD
This section will show you information about the handheld currently connected to the app. Please visit this article to connect your app to a different handheld.
Note: If there's no handheld connected (when the handheld is shut off / no battery / Bluetooth is turned off), both the Power and Mode options will display Disabled
BATTERY LEVEL
Displays the current battery power left on your handheld device.
POWER
This section can control the Scanner Mode's power level.
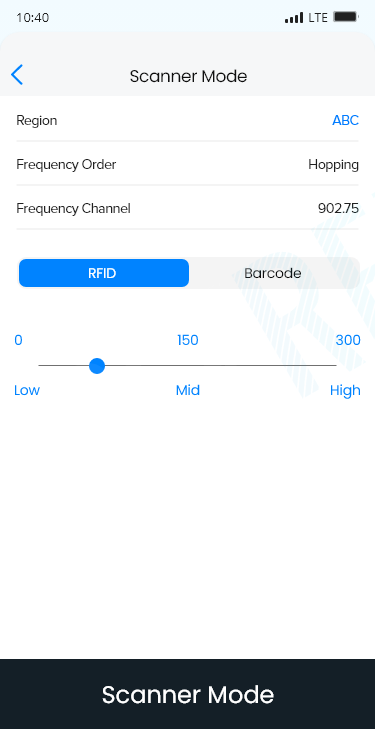
SCANNER MODE SETTINGS
Region: This is a read-only value, and it picks up the region where your handheld is from (e.g., FCC for US-made handhelds)
Frequency Order: This is another read-only value that displays the Frequency Order being used by your handheld device.
Frequency Channel: This displays the current channel (in Mhz) being used by your handheld.
RFID Mode: When this is selected, you are scanning using RFID on the Inventory page. You can adjust the power of the handheld you are currently using. The default value is at 300 (High)
Barcode Mode: This is used when you're scanning in places where radio frequencies are not allowed (e.g., planes). You should see the power system grayed out in this mode
TAG FOCUS
The default value is disabled. Tag Focus is a special mode wherein you use Impinj tags. Toggling this on will make it easier to locate Impinj tags.
FIRMWARE VERSION, SERIAL, BOARD VERSION
BT Firmware, RFID Firmware, IC Firmware, Serial, and Board Version are all read-only values and picks-up the current firmware/version of your handheld. Please visit this article to ensure that you have up-to-date firmware, if you want to update your firmware, please visit this article.
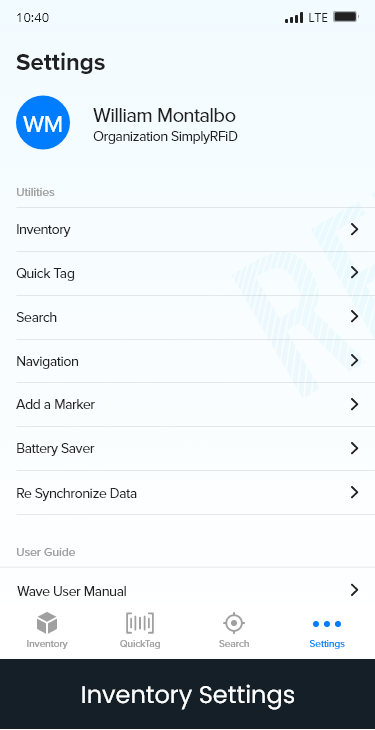
INVENTORY SETTINGS
All the settings under this page will affect your usage of the Inventory page.
MARKER (TOGGLE ON/OFF)
The default setting is turned off. Turn this on if you're using marker tags for your Inventory when scanning.
- Note: For accurate marker acquisition on locations with marker tags close to each other, RF scanning power needs to be lowered accordingly in the Handheld Information Section of Settings.*
LOCATION EXCLUSIVE MODE (TOGGLE ON/OFF)
The default setting is turned off. You want to turn on this setting to isolate the tags commissioned on a specific location, especially if your area is close to each other and you are always getting strays tags showing up every scan.
COMMISSION ONLY MODE (TOGGLE ON/OFF)
The default setting is turned off. It is recommended to keep this toggled on --- because with Commission Only Mode you can scan Inventory with only the RFIDs you've already tagged and saved. It limits showing any tags lying around that you haven't added into your system yet.
RFID Text Only (TOGGLE ON/OFF)
The default setting is Off. You can turn this on should you want your scan to display only the RFID tag.
QUICK TAG SETTINGS
RF POWER
The default setting is 80. This setting allows you to adjust the strength of your read range when commissioning tags. Generally, you want to keep it low when tagging assets one at a time. This way, you will avoid accdidentally picking up other tags. You can also set it higher when you tag items in a batch. A good example is when you're tagging assets inside a wooden crate where you might only pick up some of the tags within the bottom of the container.
FIELDS
The default setting is toggled off. These are optional fields for any information you need when you commission items.
NAVIGATION
The Navigation setting can select your default map application that Wave will open when you use GPS-coordinates search.
BATTERY SAVER
The default setting is Off. The recommended setting is to keep it off. But depending on how you want to use it, you can turn it on. It will disconnect from the server after the screen times out. When you turn on the app again, it will reconnect for about 3-5 seconds.
USER GUIDE / USER MANUAL
This will redirect you to our Wave User Manual.
This section will guide you through the steps to configure the optional settings in Pogi. These optional settings can be customized depending on your business needs.
Managing your Data Columns
This section will guide you on how to manage your Data Columns.
When to Manage Data Columns?
Managing data columns is helpful to make the Pogi software aligned with your current business records. An example of this is when your business records call the source of your products a Supplier. By default, there is a data column called Manufacturer in Pogi. Administrators can modify its Display Name from Manufacturer to Supplier to reflect the same name your business calls on your documents. If you don’t have any preferred names for your columns, leave this as is.
Another scenario is when you have a field that should only accept values from a fixed list of items. An example of this is the Size data column. If your business sells only three sizes: Small, Medium, and Large, then users should only choose from these three sizes. This scenario will make the Size data column easier to answer if it’s a dropdown and not a text. This also eliminates cases where it will input incorrect sizes like smal, Med, Large. If you need a preferred list, leave the data column as Text. Also, if you have the data column set as Text, and your business has no preferred length for the inputs, then leave the Maximum Length as is.
Don’t modify these data columns for the sake of changing them. This should only be modified if your business needs it. If you have customization requirements, reach out to our Customer Support. We’ll assist you in making your Pogi aligned with your business.
What are Data Columns?
Data columns are fields for data that your business may or may not use. An example of this is the Manufacturer data column. If your business needs to know the Manufacturer of all your items, then this data column should be a required field. Otherwise, you are going to mark it as not required.
Data columns can be classified into three types:
| Type | Description |
|---|---|
| Fixed | Fixed data columns are fields that you cannot modify. These are the data columns with the System as their type. The Pogi software requires these fields to work corrrectly. Hence, the data for these data columns are all system-generated. An example of this is the Added Date field. |
| Partially Modifiable | Partially modifiable data columns are fields that you can modify. But, you can only modify its Display Name depending on what you call it on your business records. These are the data columns with the Number and File as their type. An example of this is the MSRP field. Data columns with Number as their type allow the user to input numerical data. It can handle values with total of nine digits on both sides of the decimal point --- up to ten thousands in the whole numbers and ten thousandths for decimal digits. Moreover, Data columns with File as their type allow the users to input attached or uploaded files. Files can be, for example, a PDF or an image. |
| Fully Modifiable | Modifiable data columns are fields that an Administrator user can alter. Administrators can modify two things. First, administrators can change their Display Name depending on what they call it on their business records. Second, administrators can make these data columns as either Dropdown or a Text field. The Administrator should set these fields before other users input inventory data. It is also not recommended to switch the data column type from text to a dropdown and vice versa when there is already existing inventory data. An example of this is the Asset Id. Data columns with Dropdowns as their type allow an Administrator user to create a list of items from which other users can choose. The input data for this type of data column is the selected value of a user from the list above. Moreover, data columns with Text as their type allow the users to type the input data freely. This can be a combination of alphanumeric and special characters. The maximum length of the text varies for each data column. The field only accepts UTF-8 character encoding. |
Editing a Data Column
Administrator users can edit their data columns by following the steps below:
- Go to the Settings page.
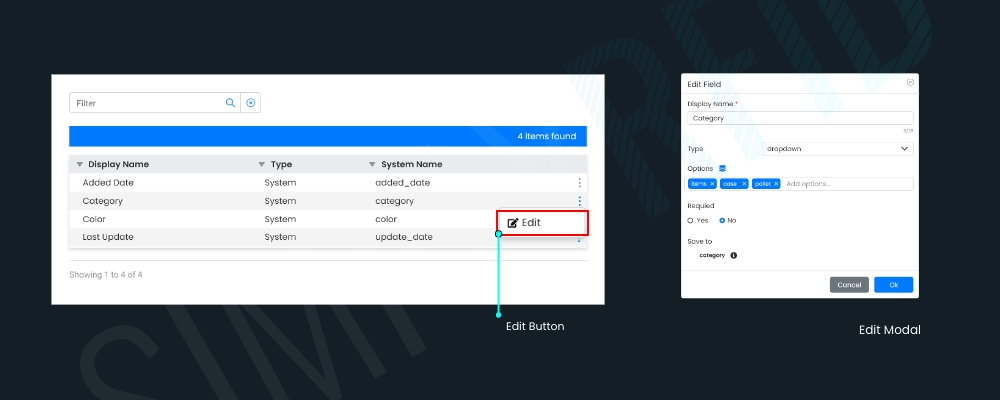
- Select a Data Column you would like to edit. Data columns are listed under the Display Name column.
- Click the corresponding Menu button of the data column you would like to edit. This can be seen on the rightmost part of the row your selected data column is on. Once you press it, an Edit button will appear.
- Click the Edit button and the Edit Field pop-up should appear.
Note: Make sure that the data column you are selecting is a modifiable data column.
- The Display Name is a required field. Name it as you see fit.
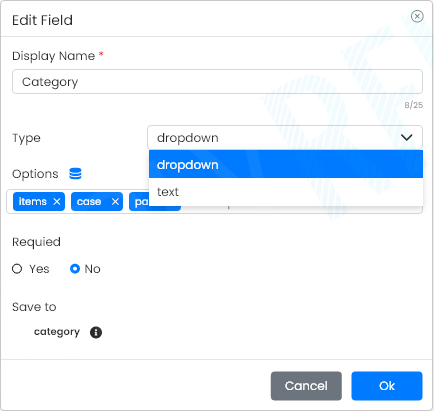
- Select the data column type. Using the dropdown field for options, you will track and audit is highly recommended. This way you avoid typographical and linguistic errors. Otherwise, you can keep it as text.
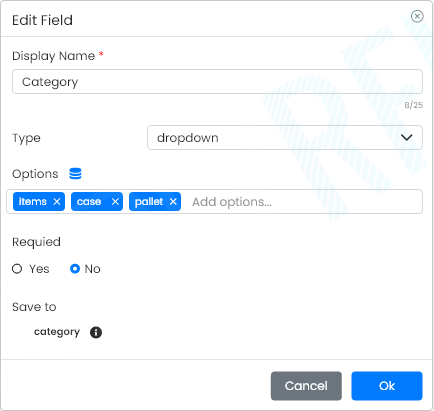
For Dropdown fields, follow the steps below:
- By selecting the dropdown option, an additional field will be displayed. Under Options, you will input the values other users can choose from.
- Press the Add button to add the option you typed in.
- You are allowed to add multiple options. In case you need to remove any other options, press the X button beside the option you choose to remove.
For Text fields, follow the steps below:
- Type in the maximum character length as needed. If you need an idea of how many characters you need to use, leave it as is and later on amend the input when you have a number in mind.
- As a rule, you want to set necessary fields as required. Otherwise, select No.
- When you're happy with the changes, click the OK button.
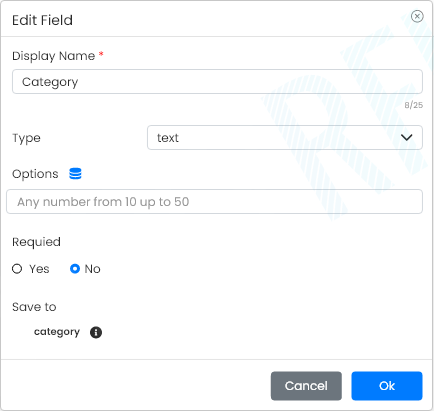
The Save To information section is for developers. This is fixed and can’t be modified. It displays helpful information such as Database Data Type, Allow Nulls, and Key Type. It can be expanded and collapsed by clicking the Info button.
Managing Markers
This section will guide you on how to manage your Markers.
What is a Marker?
A marker is an RFID tag you use to mark a sub-location. This identifies group of RFID tags that are within the vicinity of your Marker. Afterwards, in your inventory data, you'll have an option to toggle the Marker column. You should see which Marker your item is near.
Creating, Editing, and Removing Markers
To create a Marker follow the steps below:
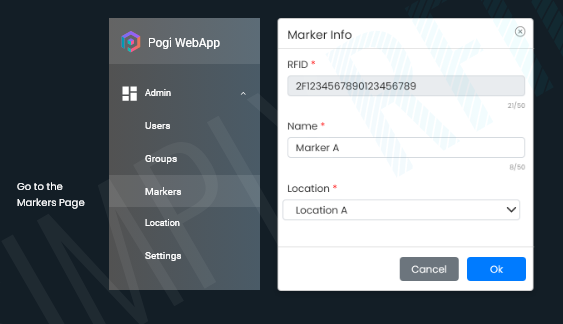
- Go to the Markers page.
- Click the Add Marker button located near the top-left corner of your screen.
- Clicking the Add Marker button, the Marker Info pop-up will appear.
- Supply all the required information. The RFID field is where you input the 24 hexadecimal characters of the RFID Tag you want to commission as a marker. The Name field is where you input the name of the marker. The Location field is where you select the location where you will place the marker after commissioning it.
- Click the OK button to save the changes. Otherwise, click the Cancel button to cancel the action.
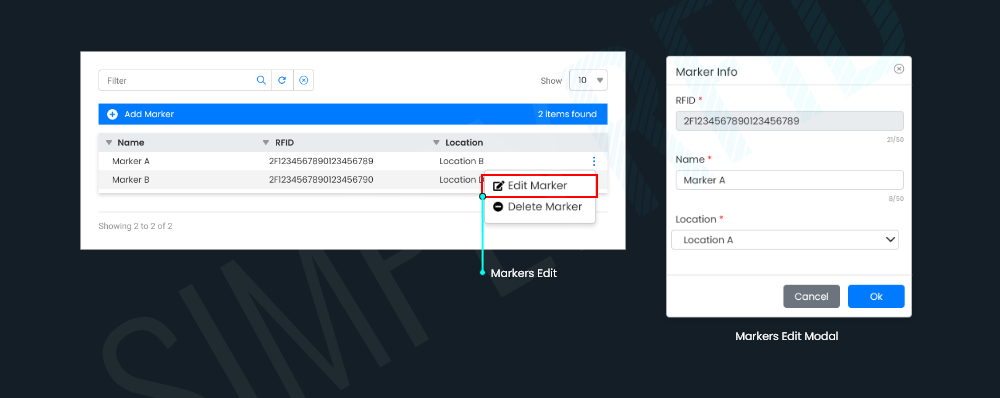
To edit a Marker follow the steps below:
- Go to the Markers page.
- Click the Menu button corresponding to the marker you want to edit and click the Edit Marker button.
- After clicking the Edit Marker button, the Edit Marker pop-up will appear. Users can only change the Marker’s Name and Location.
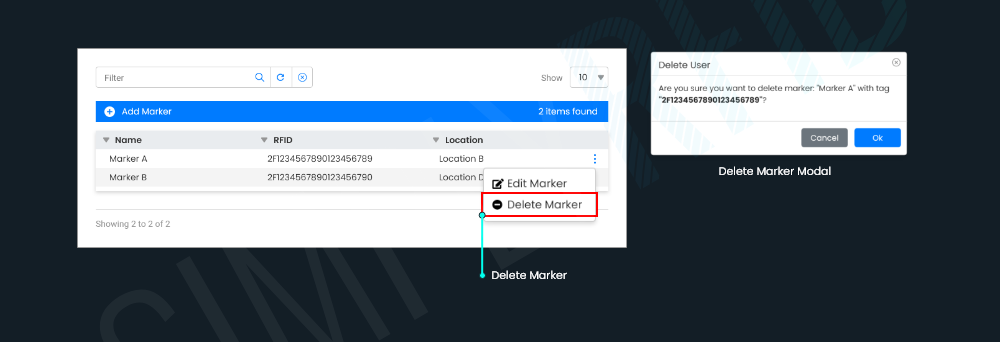
To delete a Marker follow the steps below:
- Go to the Markers page.
- Click the Menu button corresponding to the marker you want to edit and click the Delete Marker button.
- After clicking the Delete Marker button, the Delete Marker pop-up will appear. It will verify if the user wants to delete the selected marker.
- Click the OK button to delete the marker. Otherwise, click the Cancel button.
Now that you have completed your Wave and Pogi setup, we're ready to move to managing your inventory.