How to Track Your Inventory with an RFID Inventory Management System
In this manual, we've broken down the steps necessary to make your inventory counting worthwhile. The direction we laid out here is easily scalable regardless of the size and industry you are in. This will give more meaning to what you've learned from our Wave and Pogi User Guide. If you haven't read it yet, please do so.

This section is going to guide you through the entire inventory process.
The first step in building a robust inventory is to write down a list of all your item types. This list should include all of your items for sale; the “finished goods." When writing this list, think about the following pieces of information:
- The item’s name
- A description of the item
- The item’s cost
- The sales price
- And a “Stock Keeping Unit” otherwise known as an SKU.
The SKU will be an important piece of information used to track your item across multiple software systems. This value will be used as an identifier for your products. You may use an existing identifier like a UPC or a part number. So long as you feel that value will not change for the life of the product.
Some notes about SKUs:
- Each SKU is unique to a very particular product. A “blue eraser” and a “red eraser” should not have the same SKU. Each SKU identifies a single product, with a single set of options.
- SKUs may be used when purchasing to request the exact same item each time, or an SKU may be used by a customer to request a very specific item they’ve purchased from you in the past.
- SKUs will be used as an identifier in your omni-channel solution.
With this information in mind, begin compiling a list of all of your products. Depending on the size of your organization and the scale of your inventory, this list might be as simple as recording each of these pieces of information into a spreadsheet, or you can record the items directly into your company’s accounting software, like QuickBooks, Netsuite, Shopify… There are many great solutions out there.
I’ve got a list of SKUs already. Someone created it a long time ago and it’s a huge mess!
You probably already have a system that manages all of your SKUs. Many organizations have them and they’ve got decades of SKUs stored, and maintain lists of tens of thousands of different part numbers.
You’re in luck, that list is probably a great starting point. Make sure the list has all the pieces we talked about earlier, SKU, name, description, price, value. Ensure that you are using a unique SKU for each item type and that you’re not trying to shoehorn multiple types of items into a single SKU. It may take some time to really do a complete audit of this list, but it is worth it. You will need a good solid starting point before you can reconcile your inventory.
Can I use a single SKU with multiple options, like color, size, or finish?
Yes and no. Most software platforms will allow you to customize your list of SKUs to include multiple options; however, you may notice that each option will end up with its own unique identifier. For example, this table shows you two products that are options of the same eraser type with the same SKU. Each type has a special indicator in the SKU to separate them from one another.
| SKU | Name | Description | Cost | Price |
|---|---|---|---|---|
| 01984158710934-R | Red Eraser | A red eraser, used for removing pencil marks from paper. | $0.35 | $0.99 |
| 01984158710934-B | Blue Eraser | A blue eraser, used for removing pencil marks from paper. | $0.35 | $0.99 |
Eventually, you’re going to need to store a unique “stock on hand” quantity value for each of these items, so you’ll need to account for each one separately.
Taking it a Step Further

Many retailers convert their SKU list to a UPC Barcode. This will make your life easier at every step of the process. It’s understandable though if you don’t have it yet. We highly recommend you get your GTIN from GSI and start using UPC.

Now that you’ve managed to configure your Pogi server and set up your SKU list, we can now begin auditing your existing inventory. Managing your inventory is a crucial part of your daily business process - whether you do partial, cycle, periodical, or perpetual inventory. At the end of this guide, managing inventory with RFID technology will change the way you look at inventory management in general.
Labeling and tagging your inventory
After creating your SKUs, we are now ready to use Wave to associate these individual items.
You’ll need the following items before following the steps below:
- Wave Handheld RFID Reader
- Complete SKU List
- RFID Labels
- Your physical items
We’ll be adding these items using your Wave App. Leveraging the Quick Tag function as much as you can to make it easier for you, not only to commission new items into the database but also to revolve a business process around it.
Please follow the steps below to add new items to your inventory using the Quick Tag feature.
Step 1: Scan the tags using Quick Tag
- Begin by launching the Wave app and selecting Quick Tag.
- Once you’re on the quick tag screen, select your location.
Step 2. Scanning the SKU
- When you’re done choosing your location, tap on Asset ID field to input the SKU.
- Scan, or input, your SKU/UPC from your barcode. If you don't have a barcode, please read this chapter.
- Using the 2D Barcode reader module on your handheld, point it towards the UPC. Squeeze and hold the trigger until the UPC show up on the Asset ID field.
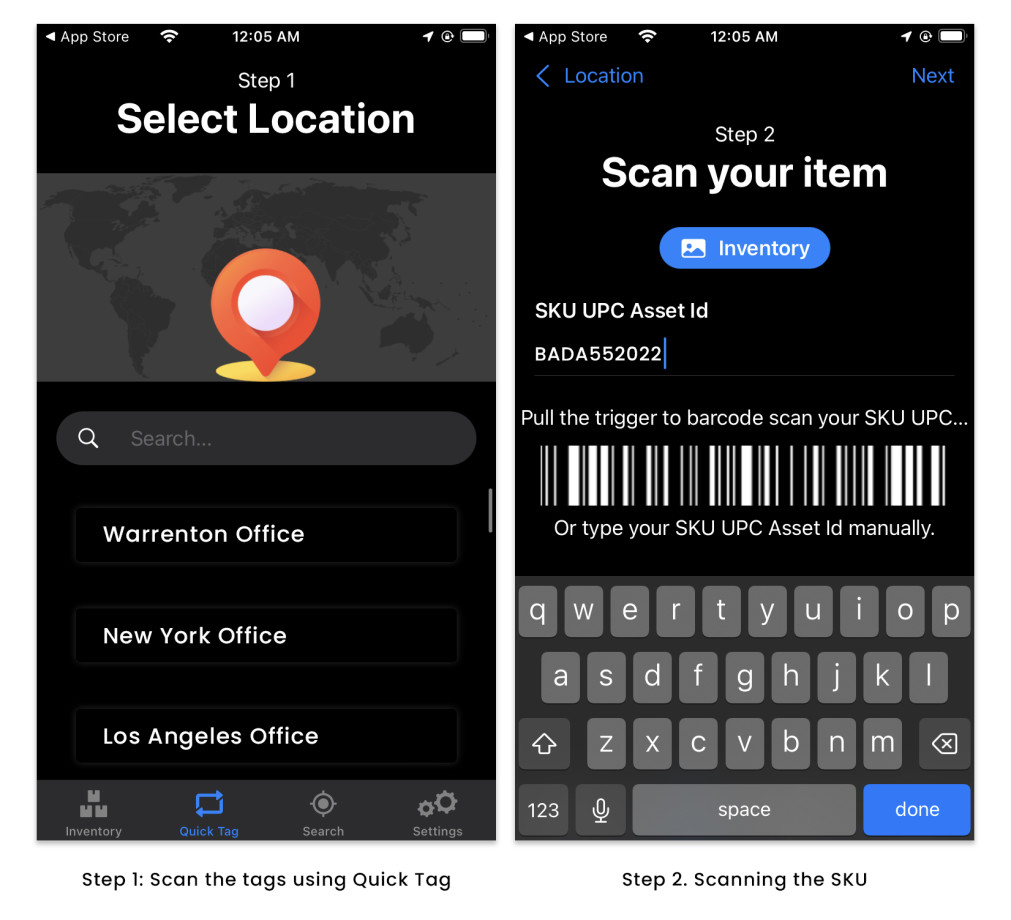
Note: Do not type in the UPC or SKU. Not only this would be exhausting and tedious when you have to scan many SKUs, but also it presents a huge risk of inputting wrong data
Step 3. Scanning your RFID tags
Note: Turn up the volume on your cellphone to hear the magical sound of RFID.
- You’ll see the quantity displayed on the leftmost side of the page.
- If it doesn’t match the amount you need, continue scanning your labels; however, if you pickup tags that were previously commissioned, swipe left on the line item and tap Delete.
- When you’re happy with the details, tape Save on the upper right hand corner of the screen.
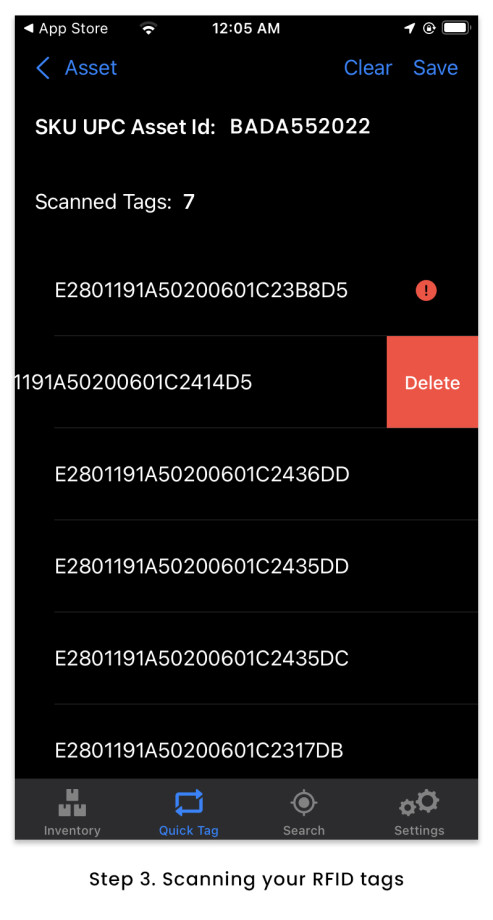
After saving, a success message should prompt you if the RFID tags has been successfully commissioned. The system will prompt you if either the added RFID tags are currently existing in system. If not, a success message will show up instead.
Step 4. Apply the labels to your physical inventory
- Start by peeling off the tags from the sticker backing.
- Apply it to the surface on the corner that’s farthest away from the product inside the packaging.
Follow the specific tagging instructions for the appropriate vertical your item belongs:
Apparel Tagging Guide
Wine Tagging Guide
Jewelry Tagging Guide
If your product is not packed in a cardboard box or if you’re tagging directly into an items, please contact SimplyRFID so we can guide you through which tags will be perfect for your items.
What if some of my inventory is already tagged?

For items in your inventory that comes source-tagged, you just need to do an inventory audit and save it on your Location. Follow the steps below:
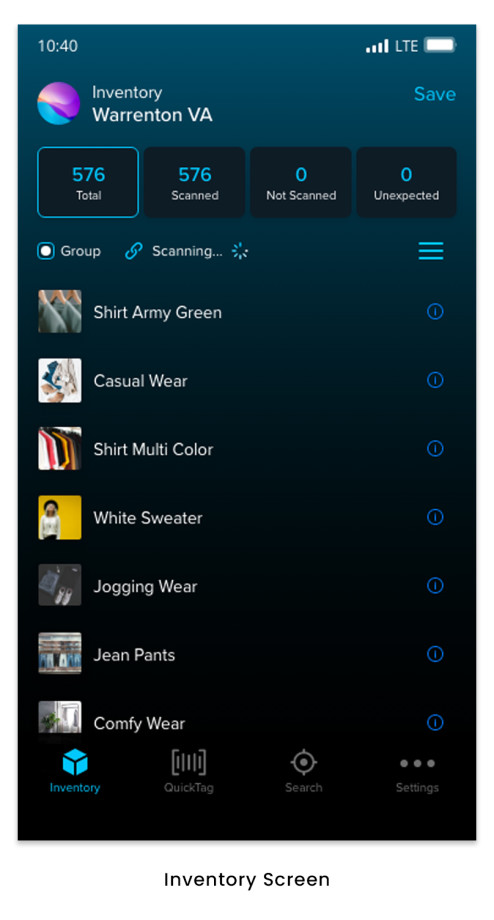
- Navigate to Wave app’s Inventory screen.
- Select the location where you want to save your items.
- Squeeze and hold the trigger. Move around the room while keeping that trigger pressed until you find all your items. It also helps if you point it toward the item’s direction.
- The inventory count will increase as you detect your inventory items. View the list of items to ensure your recently tagged inventory items have been detected.
- Once you've completed a full scan, click Save on the upper righthand part of the screen.
Checking your work

You’ve commissioned a lot of your existing inventory so far. From time to time, it’s a great idea to check your work. Setting up your inventory is a tedious process and you don’t want to do it all over again if you missed some stuff.
Please follow these steps below in order to check your inventory:
- Navigate to Wave app’s Inventory screen.
- Select the location where you commissioned your items.
- Squeeze and hold the trigger. Move around the room while keeping that trigger pressed until you find all your items. It also helps if you point it toward the item’s direction.
- The inventory count will increase as you detect your inventory items. View the list of items to ensure your recently tagged inventory items have been detected.
- Don’t worry about saving this scan – these steps are optional and only used to ensure you correctly commissioned your items.
Accurate inventory begins at purchasing. Establishing a procedure that encourages accurate inventory purchasing and detailed communication with your vendors is essential to your accounting department and goes a long way to ensure inventory accuracy.
Creating Purchase Orders and Following Up With Suppliers
Your accounting platform probably already does this. If you're using any type of software from QuickBooks to SAP, you've probably got access to features that make this easy.
It is important to establish a procedure that ensures all inventory has an associated purchase order. This is mostly important for your accounting systems; however, it's also an important step in your inventory management process. We will discuss this further in the Receiving section of this guide.
What is needed to create a purchase order (PO)?
Begin by gathering the following information. Your accounting system might make this step super easy for you:
- Vendor’s information (Where are you purchasing this item from?)
- Shipping information (Where is this item shipping? Internally, or directly to a customer?)
- Item name, part number, and description (This comes from your SKU list)
- Purchase price
- Item quantity
- Optionally: Clarify or define any internal guidelines or requests that your company has implemented to ensure other procedures.
Regardless of the methods your vendor uses to facilitate your purchase request (Maybe they have an online order form, catalog, phone ordering system, customer access portal…) You will need this purchase order for your internal records, and preferably the written purchase order can be submitted to your vendor to ensure accurate communication.
Following Up With Suppliers

You’re doing everything you can to keep your business operational, implementing proper guidelines, processes, and procedures. The fact is, 65% of businesses fail because they haven’t done this stuff yet. If your supplier happens to be one of those businesses it will be up to you to manage your own supply chain.
If a vendor provides you with a ship date that is weeks or months away, it is important to follow up with that supplier regularly to ensure they are still on track with their delivery schedule. Vendors can leave you in a lurch when they notify you the day of their original ship date that your shipment will be delayed.
Implement a procedure to follow up with vendors on a weekly basis. Every Tuesday, or Friday, your purchasing department (If you don’t have one of these, then that follow up person is YOU) needs to contact each vendor with an open purchase order to confirm the shipping date.
Encouraging Suppliers to Label Accurately

Many vendors have already discovered the importance of labeling their products with:
- Part Numbers
- Serial / Lot / Batch Numbers
- UPC (When applicable)
- SGTIN encoded RFID tags
These labels will be a vital part of your receiving and inventory management process. If your suppliers are not labeling products with these things you’ll find it vital to do it yourself as part of your receiving process.
If your vendor does not currently label their products appropriately, you can encourage the labeling process as part of your purchase order request. It probably will not be the first time they’ve received this request and won’t be the last time.
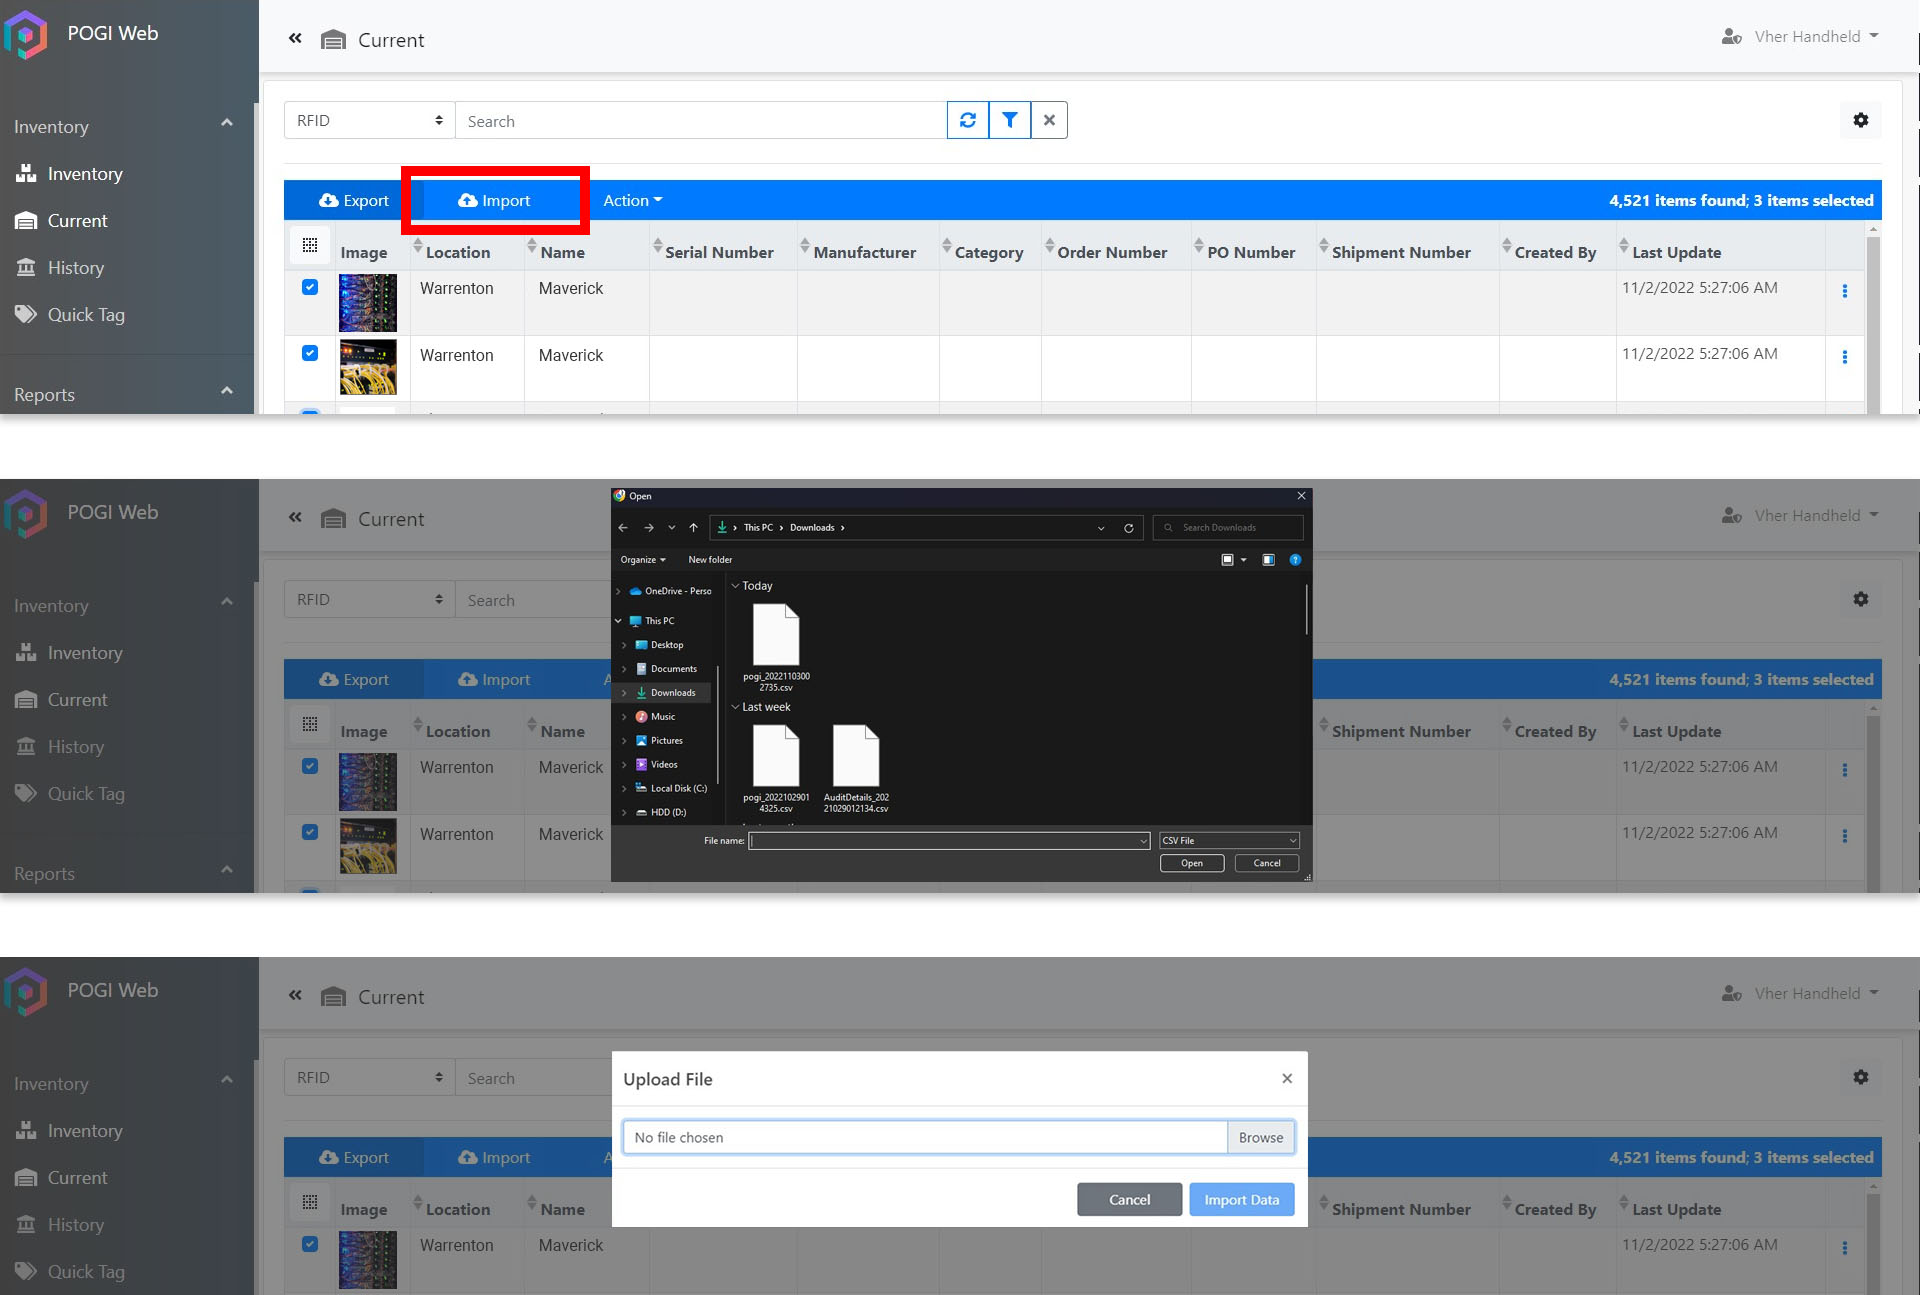
For any of your items that are source-tagged, please follow the step below:
- Export a sample CSV file using Pogi:
- Launch Pogi.
- Navigate to Current Page.
- Select any number of items. We only need this to be able to export.
- Click Export and Select CSV option.
- Open your CSV spreadsheet with any software that can read it.
- Delete the information but leave the column headers.
- Send that to your supplier as a sample CSV file.
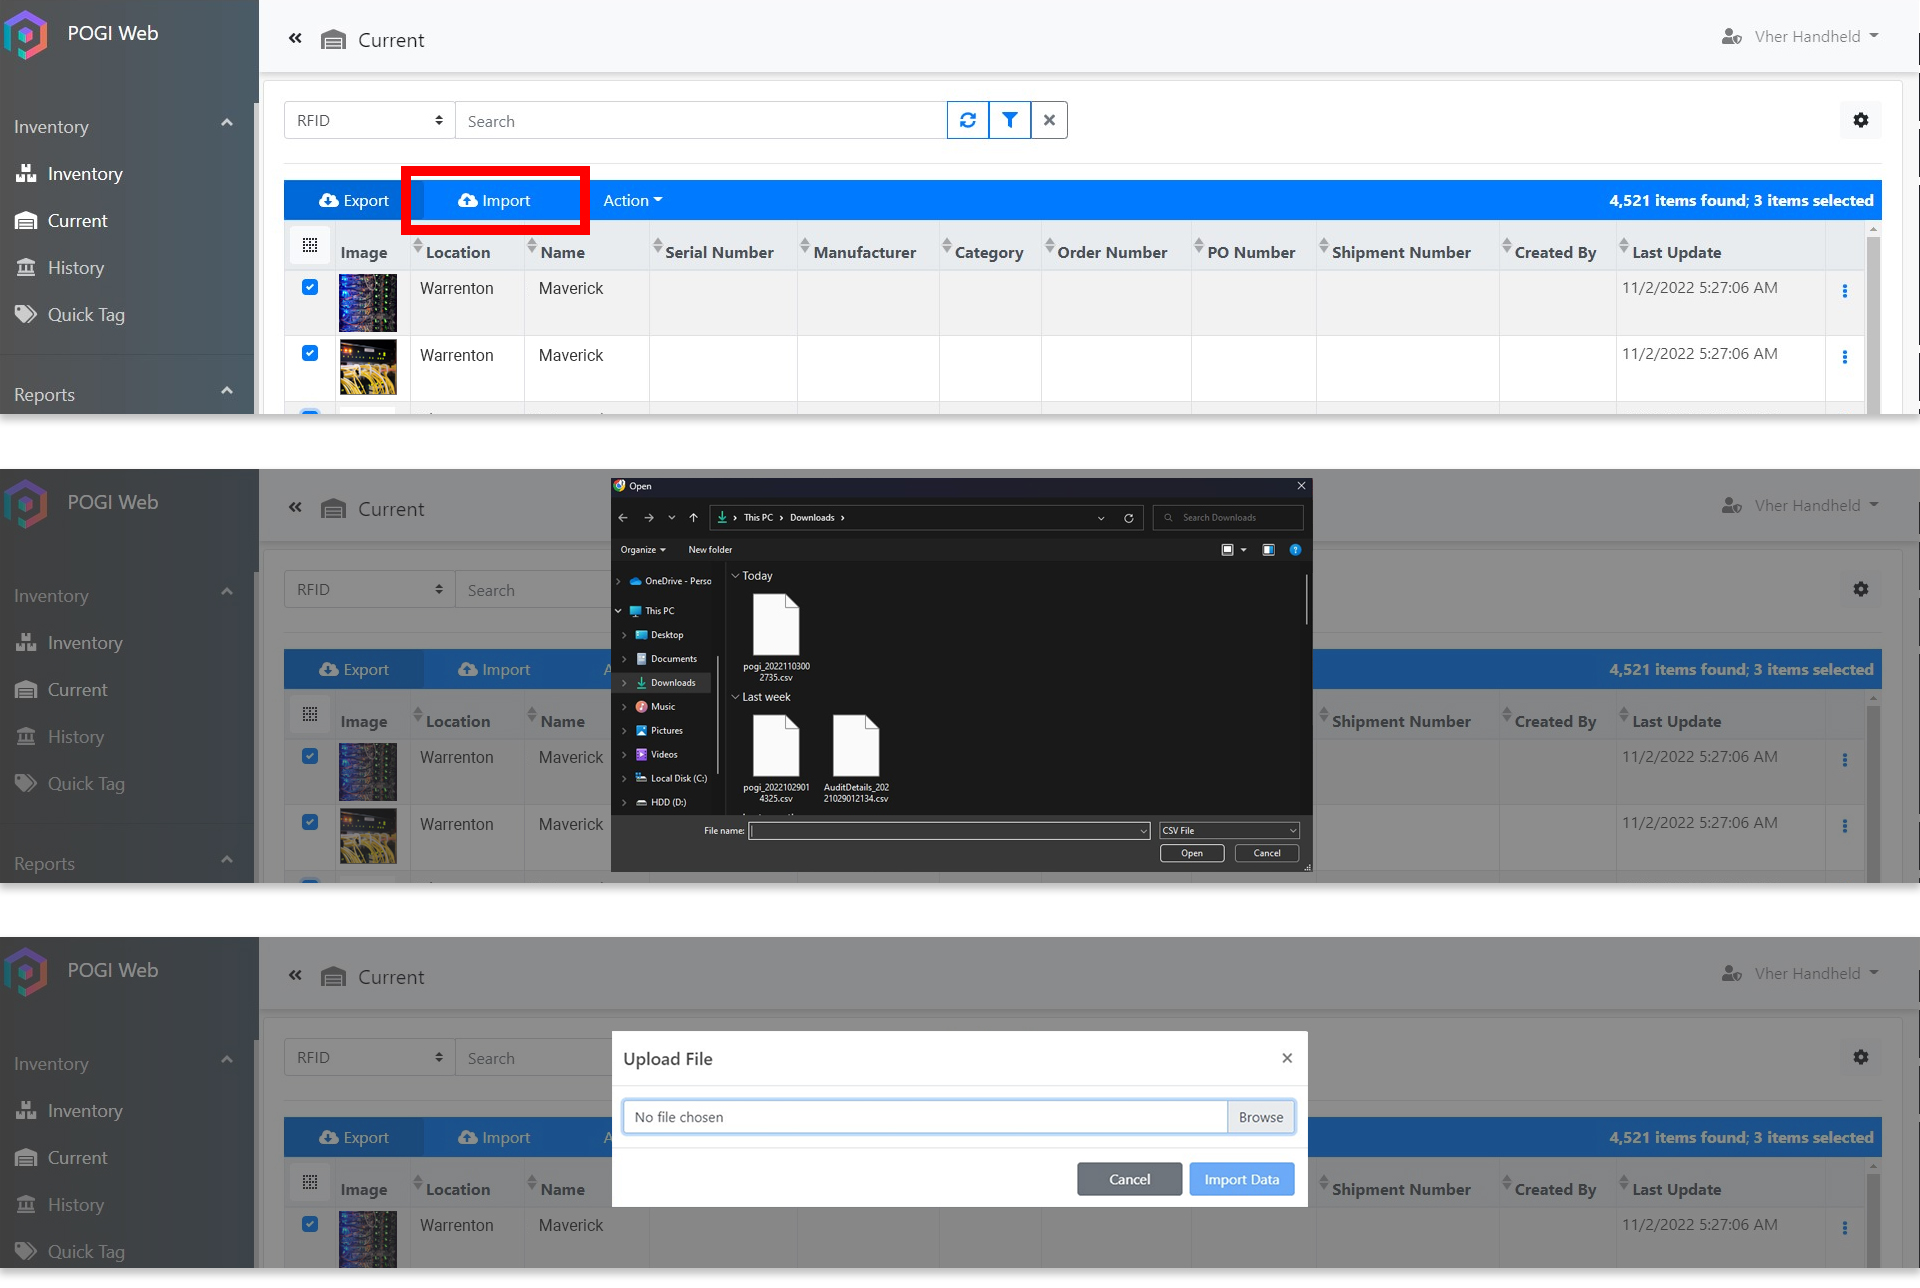
- Once you receive back your ASN from your supplier, follow these steps to import your ASN:
- Launch Pogi.
- Navigate to Current Page.
- Click the Import button.
- Look for the ASN you received from your supplier. Select the file and click the Open button.
- Click Import Data and wait for the CSV to successfully upload.
Doing your inventory will play a vital role in how you manage your business in general. This guide will show you the importance of continuous inventory and steps to stay on top of your list and give points on training staff for the inventory audit process.
Why quarterly inventory audits are not competitive

Most businesses typically perform their inventory quarterly or do a physical inventory count at the end of a specific or scheduled reporting period. Common and outdated ways of doing so are the traditional manual paper sheet counting, random or rotating section count, barcodes use, and repurposing staff to do a full inventory at once.
All of the processes mentioned above are extremely time, effort, and cost extensive, prone to high errors, and may sometimes require an operational shutdown. This is why periodic counts are not competitive, and many companies do their inventory sporadically or worse, even less than the ideal number of times.
With RFID, the most significant advantage you get is the ability to do your inventory more frequently and reduce other obstacles when counting supplies.
- RFID simultaneously scans and counts items, significantly reducing the time spent on inventory. This gives you the capability to do your inventory regularly.
- Increases accuracy by improving stock visibility. RFID can identify products wirelessly over great distances.
- Lessen manual labor and boost productivity by transferring efforts to more important ones now that RFID made inventory effortless and more convenient to perform.
Establish the Layout of your Inventory

Before doing an inventory of your items in different locations, first, you need to know the following:
- Familiarize yourself with the layout of your warehouse or store.
- Learn the breakdown of inventory locations into zones or groups.>
- Know the division of your products where they are stored and distributed, primarily if you have a massive warehouse or store.
- Establish your inventory location groups. Inventory groups are particular types of items, for example, blouses, pants, swimwear, etc.
Performing a Complete Inventory Audit

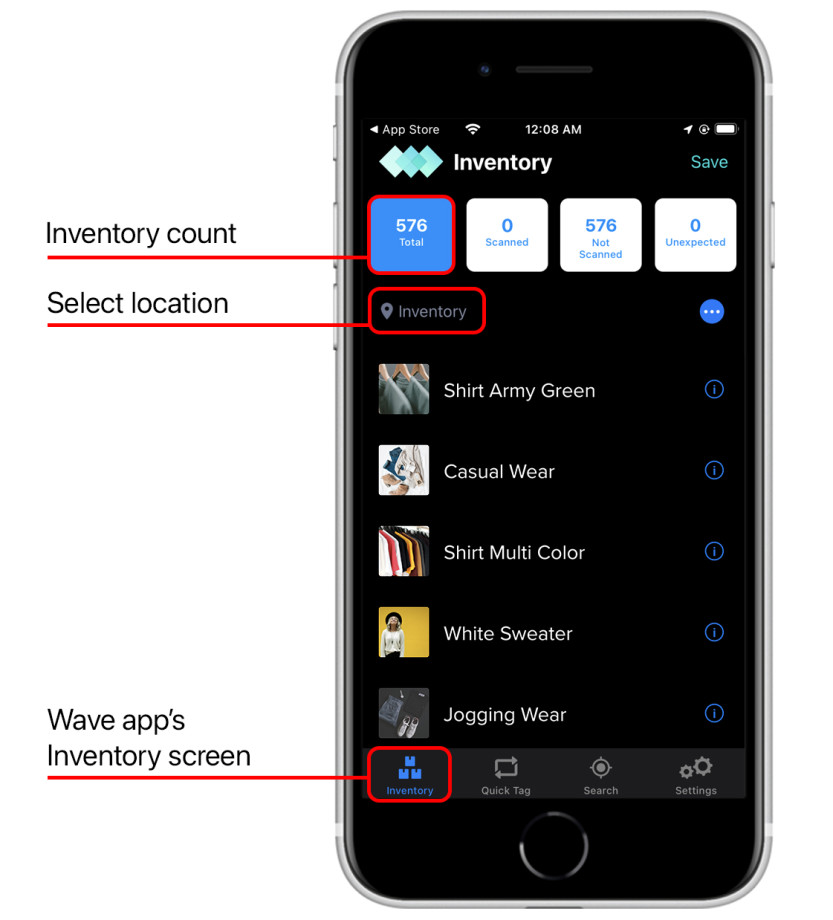
Use the Wave handheld app to scan your inventory:
- Tap on the Inventory tab.
- Select your location.
- Pull the trigger to begin counting RFID tagged inventory.
Note: You will need to move the handheld to within a few feet of each inventory asset. Treat your RFID handheld like an extremely fast Barcode scanner. You don't need to individually touch every item, you can just move to the general area of the items.
RFID is FAST. You'll see the inventory counter rise very quickly. Each beep you hear is an item being counted (Turn up the volume on your device.) Use the handheld to scan every item in your inventory.
- Once you've scanned everything, check the "unscanned" tab. This tab will show you everything you haven't seen yet. Give your inventory one more check against the unscanned items to make sure you didn't miss anything.
- Finally, tap on the Save button. You may be prompted to include unexpected items in your inventory list. Tap on Select All to include all of the unexpected items and then tap Save to record your inventory scan.
Additional Inventory Scanning Tips
If you are not finished with your inventory but you need to stop for any reason, tap the save icon and save your inventory. You can split your inventory scan into multiple attempts.
Approve or Reject your inventory scan

An administrator can log in to Pogi to analyze the inventory scan results. Check out the Audit Report page in Pogi to view a list of inventory scans.
- Click on Audit Report.
- Click on the most recent inventory scan.
- Inspect the Present and Absent counts.
- How far from realistic do these look?
- The list of absent items should be a list of all of the items you've recently sold or removed from your inventory.
- Is it approximately correct?
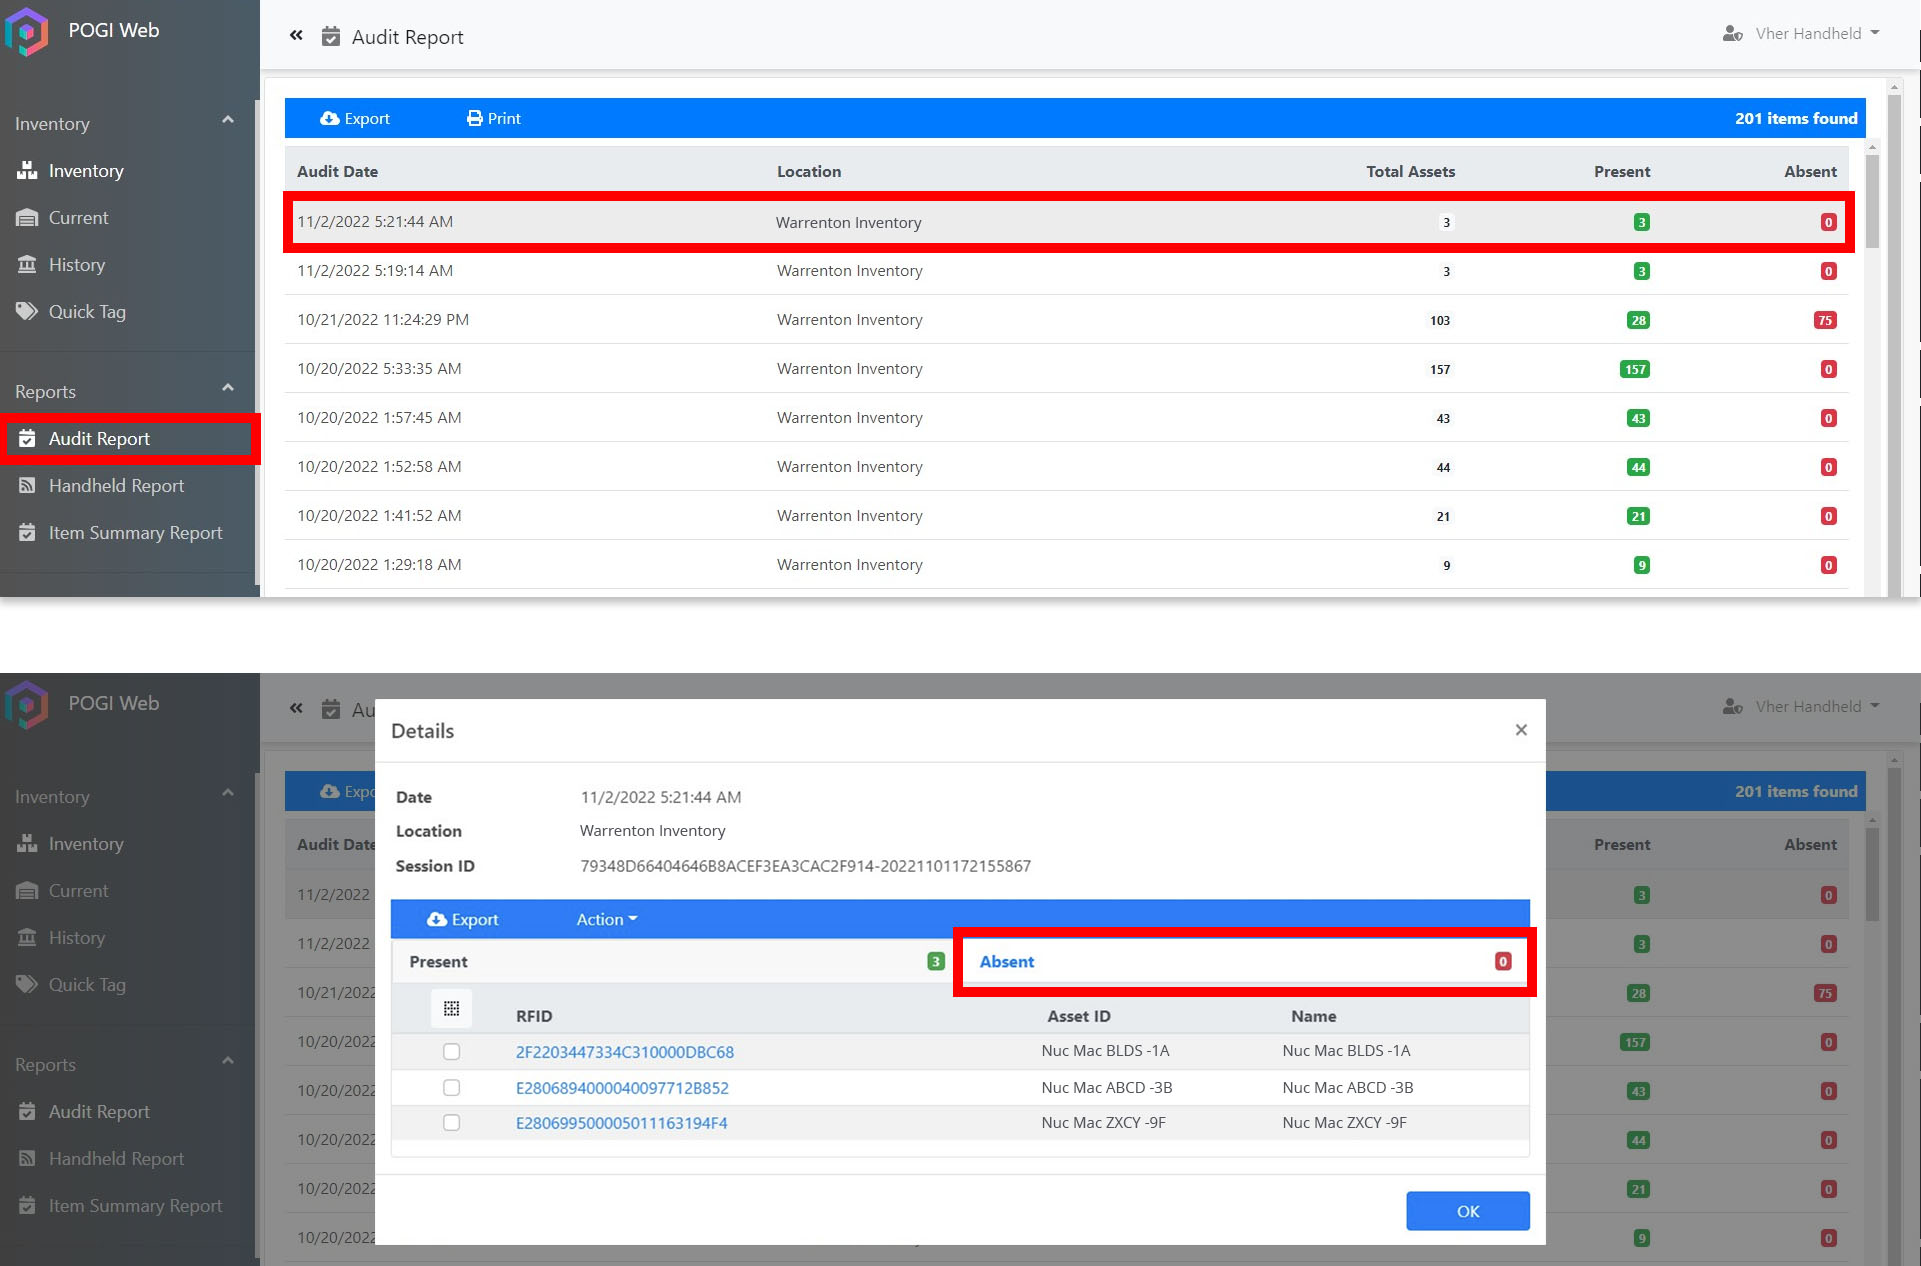
If there are discrepancies between your inventory results and your expected results:
- Ask the last person who did the scan. There are reasons why there are missing stocks. It could be an unfinished inventory report, sold, and other possible explanations. Talk to this person until you get to the bottom of things.
- Determine the underlying issue of the discrepancies and create a plan to eradicate or lessen the likelihood of recurring.
Update your inventory list

If your scan looks complete and correct, it is best practice to remove the absent items from your next inventory count.
- From the audit report details page, click the Absent tab.
- Click the selection button in the top left corner of the list, then click All.
- Next, click the Action dropdown button and select Move.
- Choose a new location for these items. It's best to create and use a Location that indicates that these items are no longer available in your active Inventory (e.g. Unused, Sold).
- Click the OK button to move the items out of your inventory.

Note: Keep in mind, items that are moved out of your inventory will show up again later if for any reason they are found and scanned in the correct location.

We replaced the old Dashboard page with this new Inventory page that’s more comprehensive and intuitive.
You can now compare the number of scanned items between two different date ranges on any or all locations and monitor the movements of your items easily.
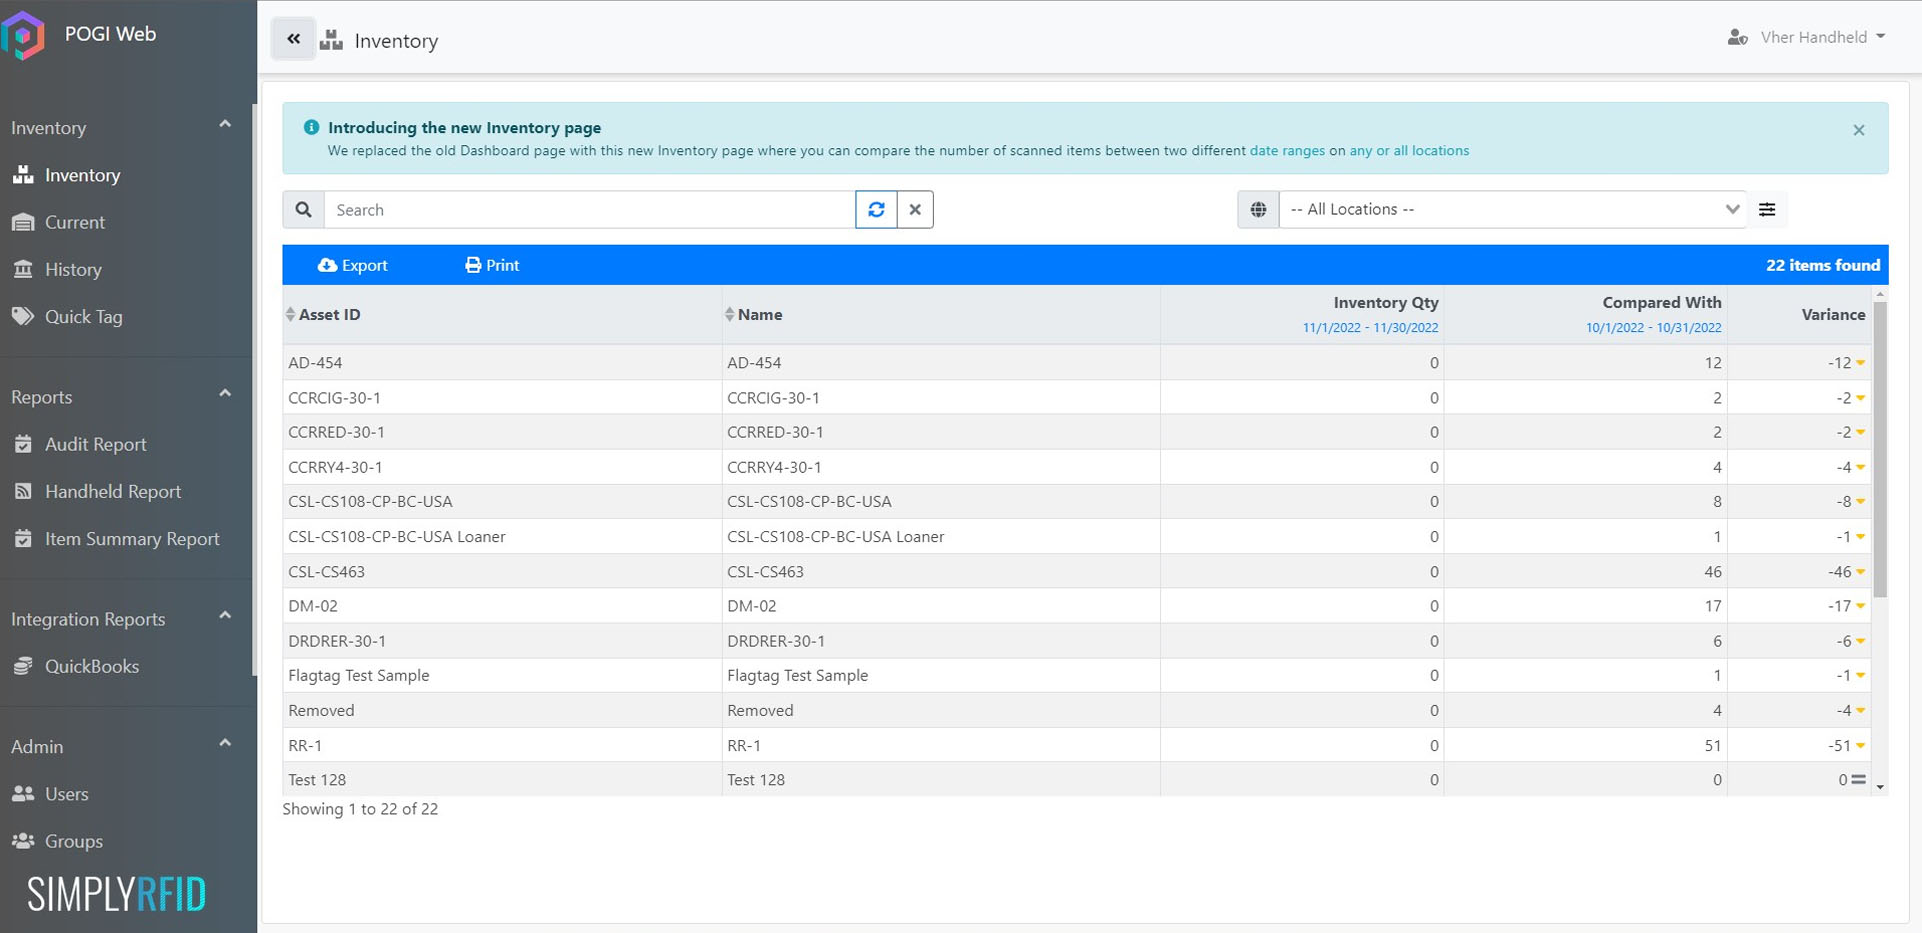
The Inventory page’s features:
- Inventory Quantity - This displays the items found and their quantity during the chosen period.
- Compared With - This displays the items found and their quantity during the chosen period which will be compared to the Inventory Quantity.
- Variance - The difference between Inventory Quantity and Compared With
- Group by - You can group to compare your items by their identified (e.g. Asset ID, Length, Color, Name)
- Quantity Field - Gives you an option to display either Item Count or Total Quantity.
- Show: Choose how many items you want to show on a single page (10, 15, 25,50,100) Date Range - You also have the date range which allows you to collate your items by certain dates (Last 24 hours, 7 days, 30 days, 90 days). You can also customize the specific time and date you want to see by clicking “Custom”.
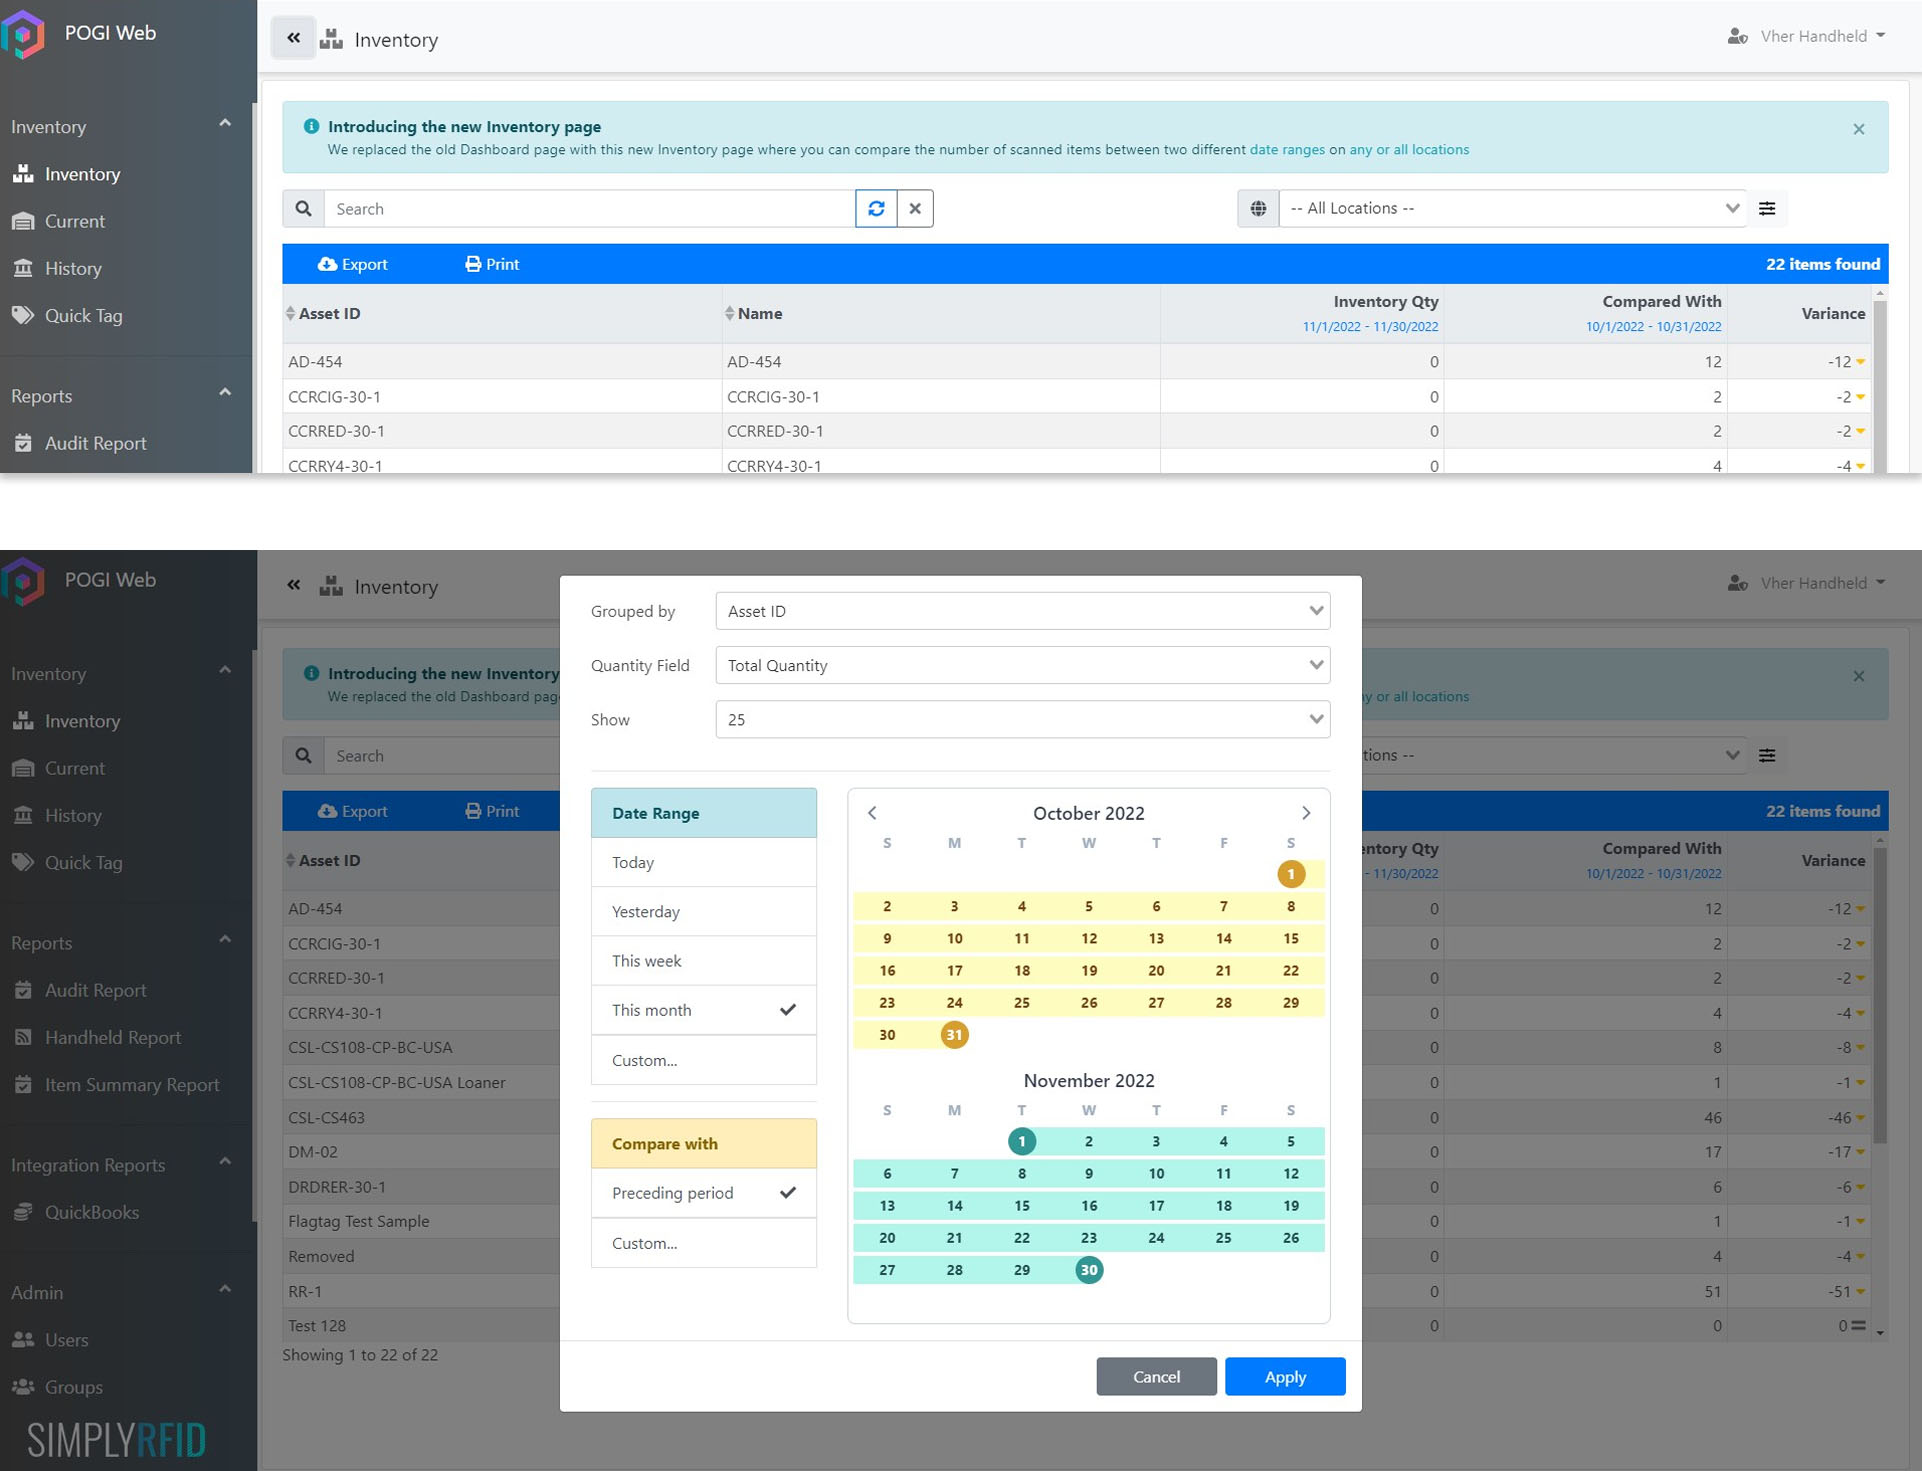
How to use the Inventory page:
- Click the date under the Inventory Quantity column header.
- A calendar screen will pop up. This screen lets you set the date range of both the Inventory Quantity and Compared With columns.
- Select the date range you want to compare against each other
- Set the dates you want to compare against each other. The sequence doesn’t matter. Your variance report will always show the difference between the two columns.
- Set the Group By field to which item identification you’d want to use. More often than not, you’d want to use Asset ID as your sorting id.
- Leave the Quantity field to Item Count.
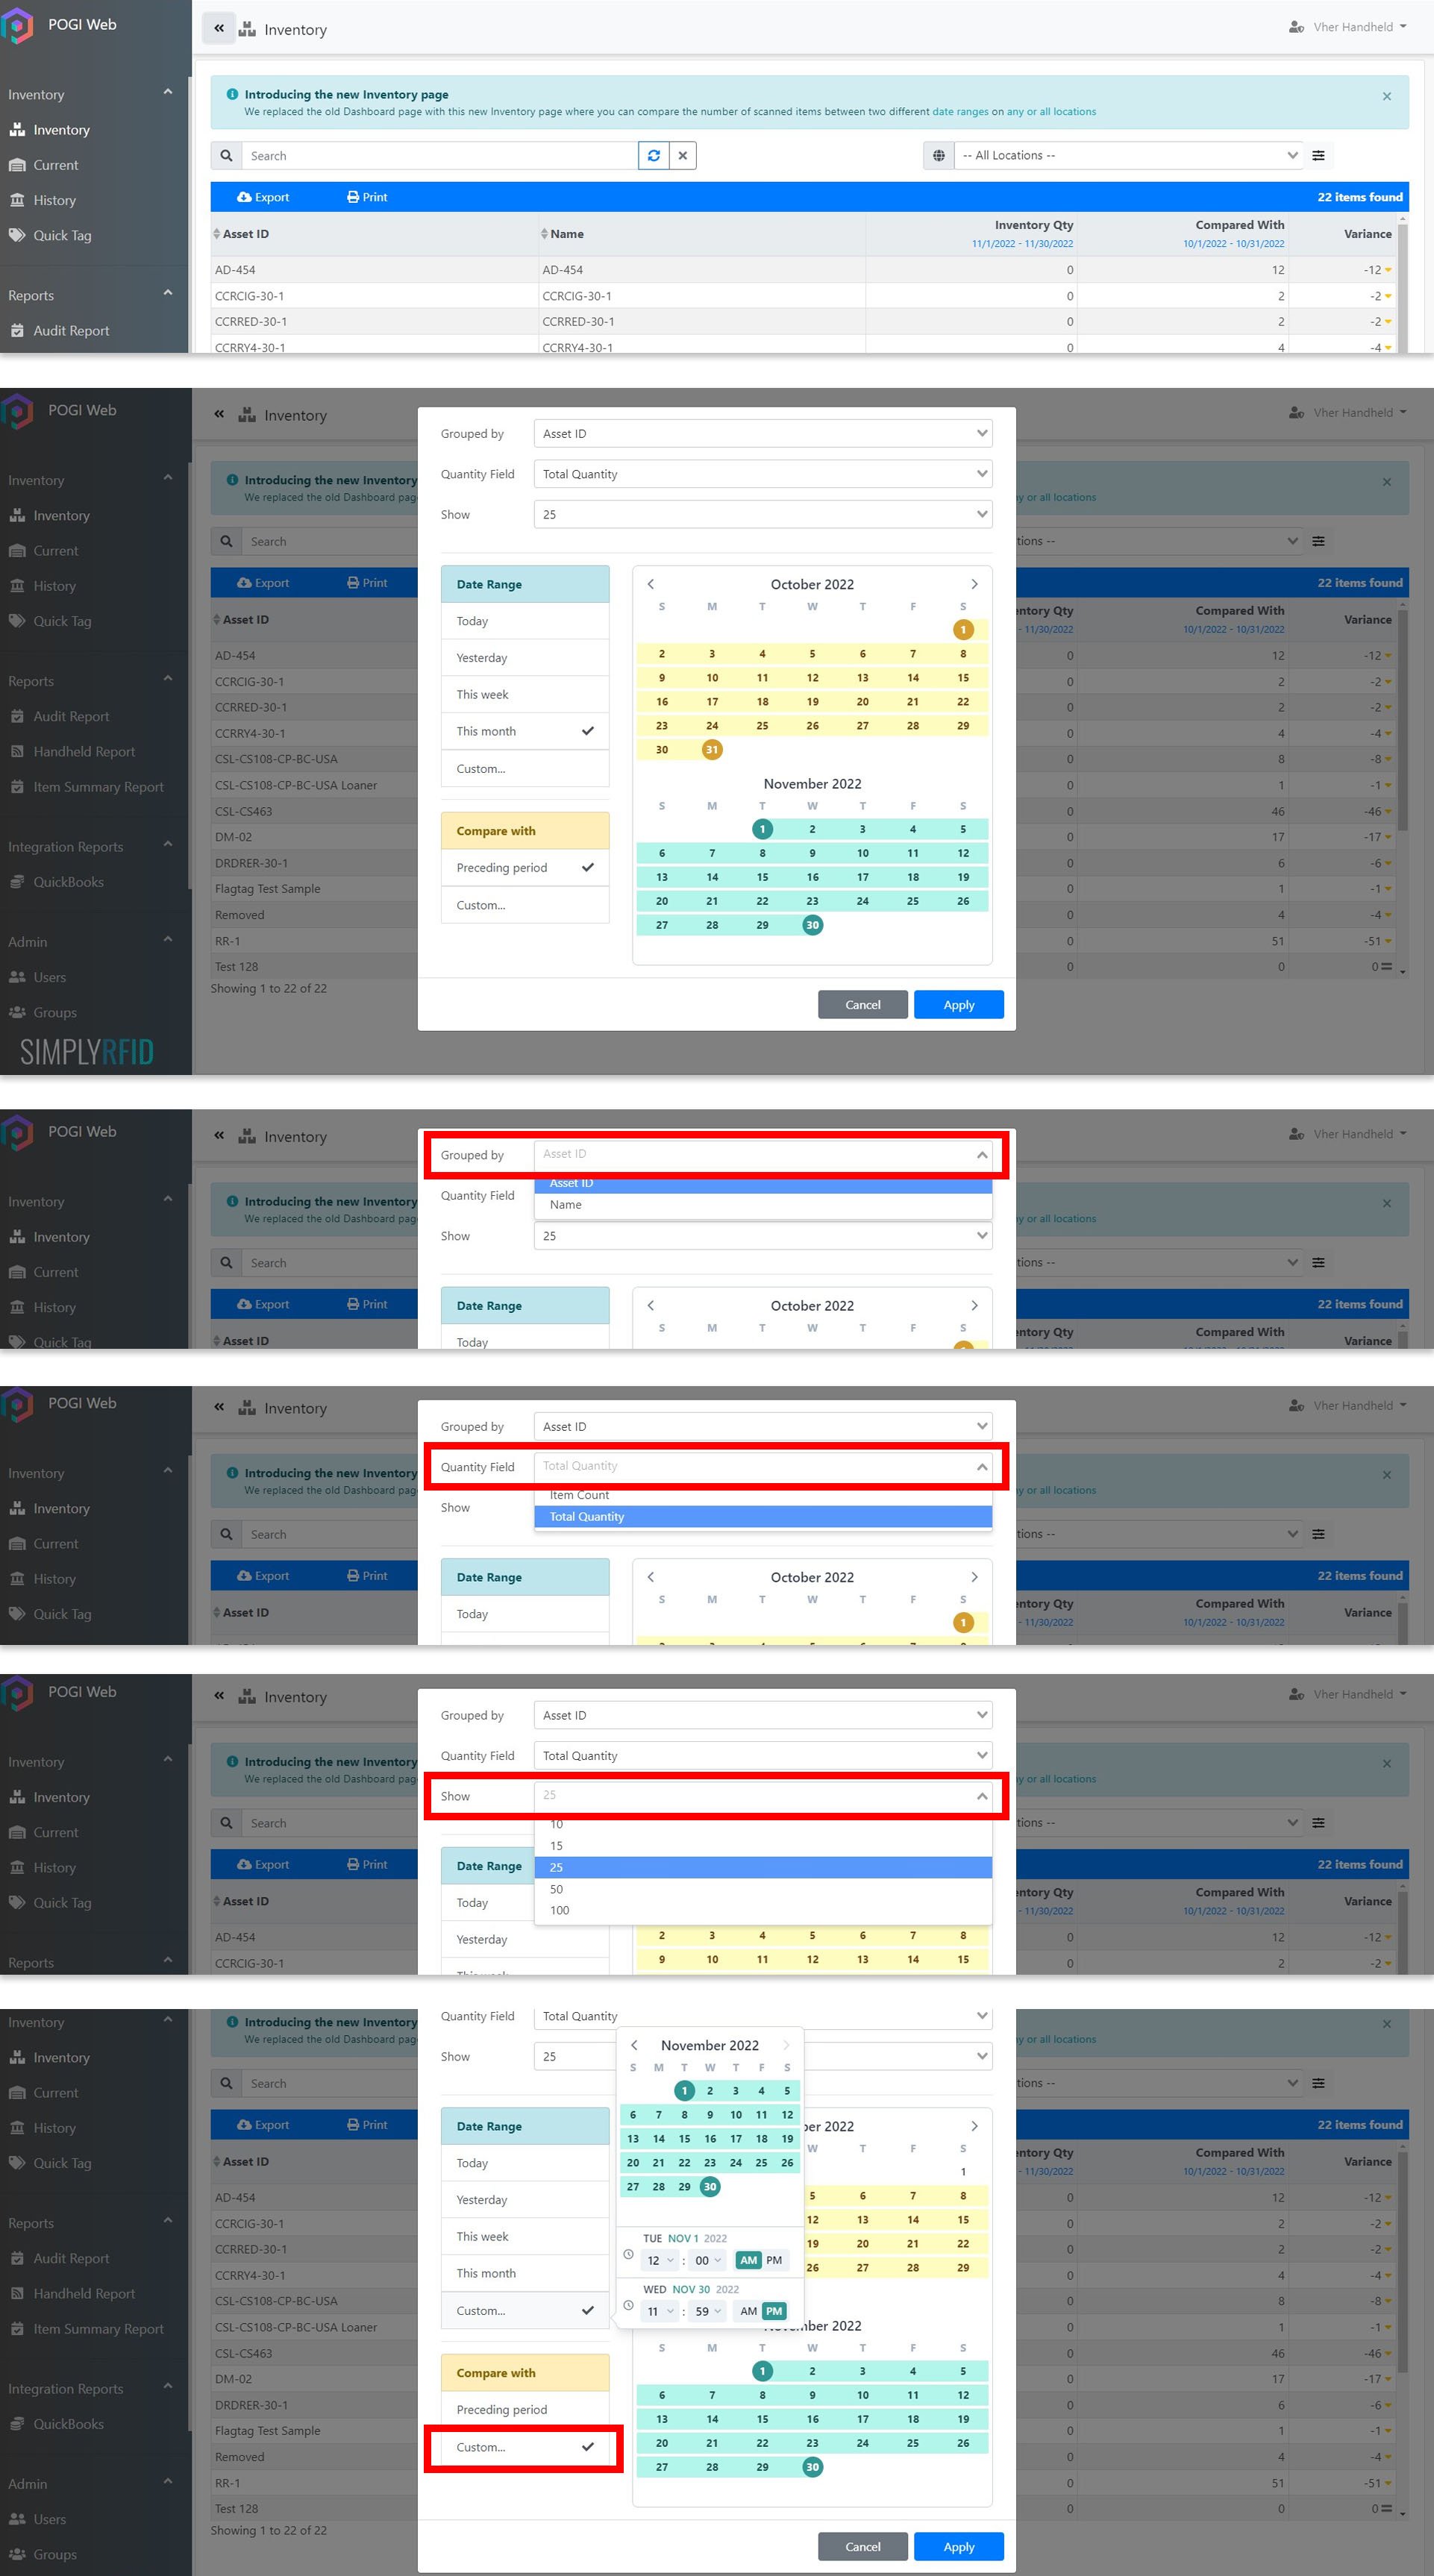
Note: There are two ways to count your inventory. If you have the Quantity field turned on in Settings, you want to use the Total Quantity option so that it includes the quantity count of each item. If you only want to get the count of each tag, set it to Item Count instead.
- You can also change the pagination using the Show field.
- When you’re happy with your settings, click Apply.
- Should you want to fiddle with the data even further using the Advanced Filter function. Click the filter icon on the upper right-hand of the screen.
- Repeat steps 1 to 8, and change the settings as necessary.
To generate your variance report into a PDF file:
- Click Print.
- A new tab will appear, select the file type (Save as PDF) then click Save.
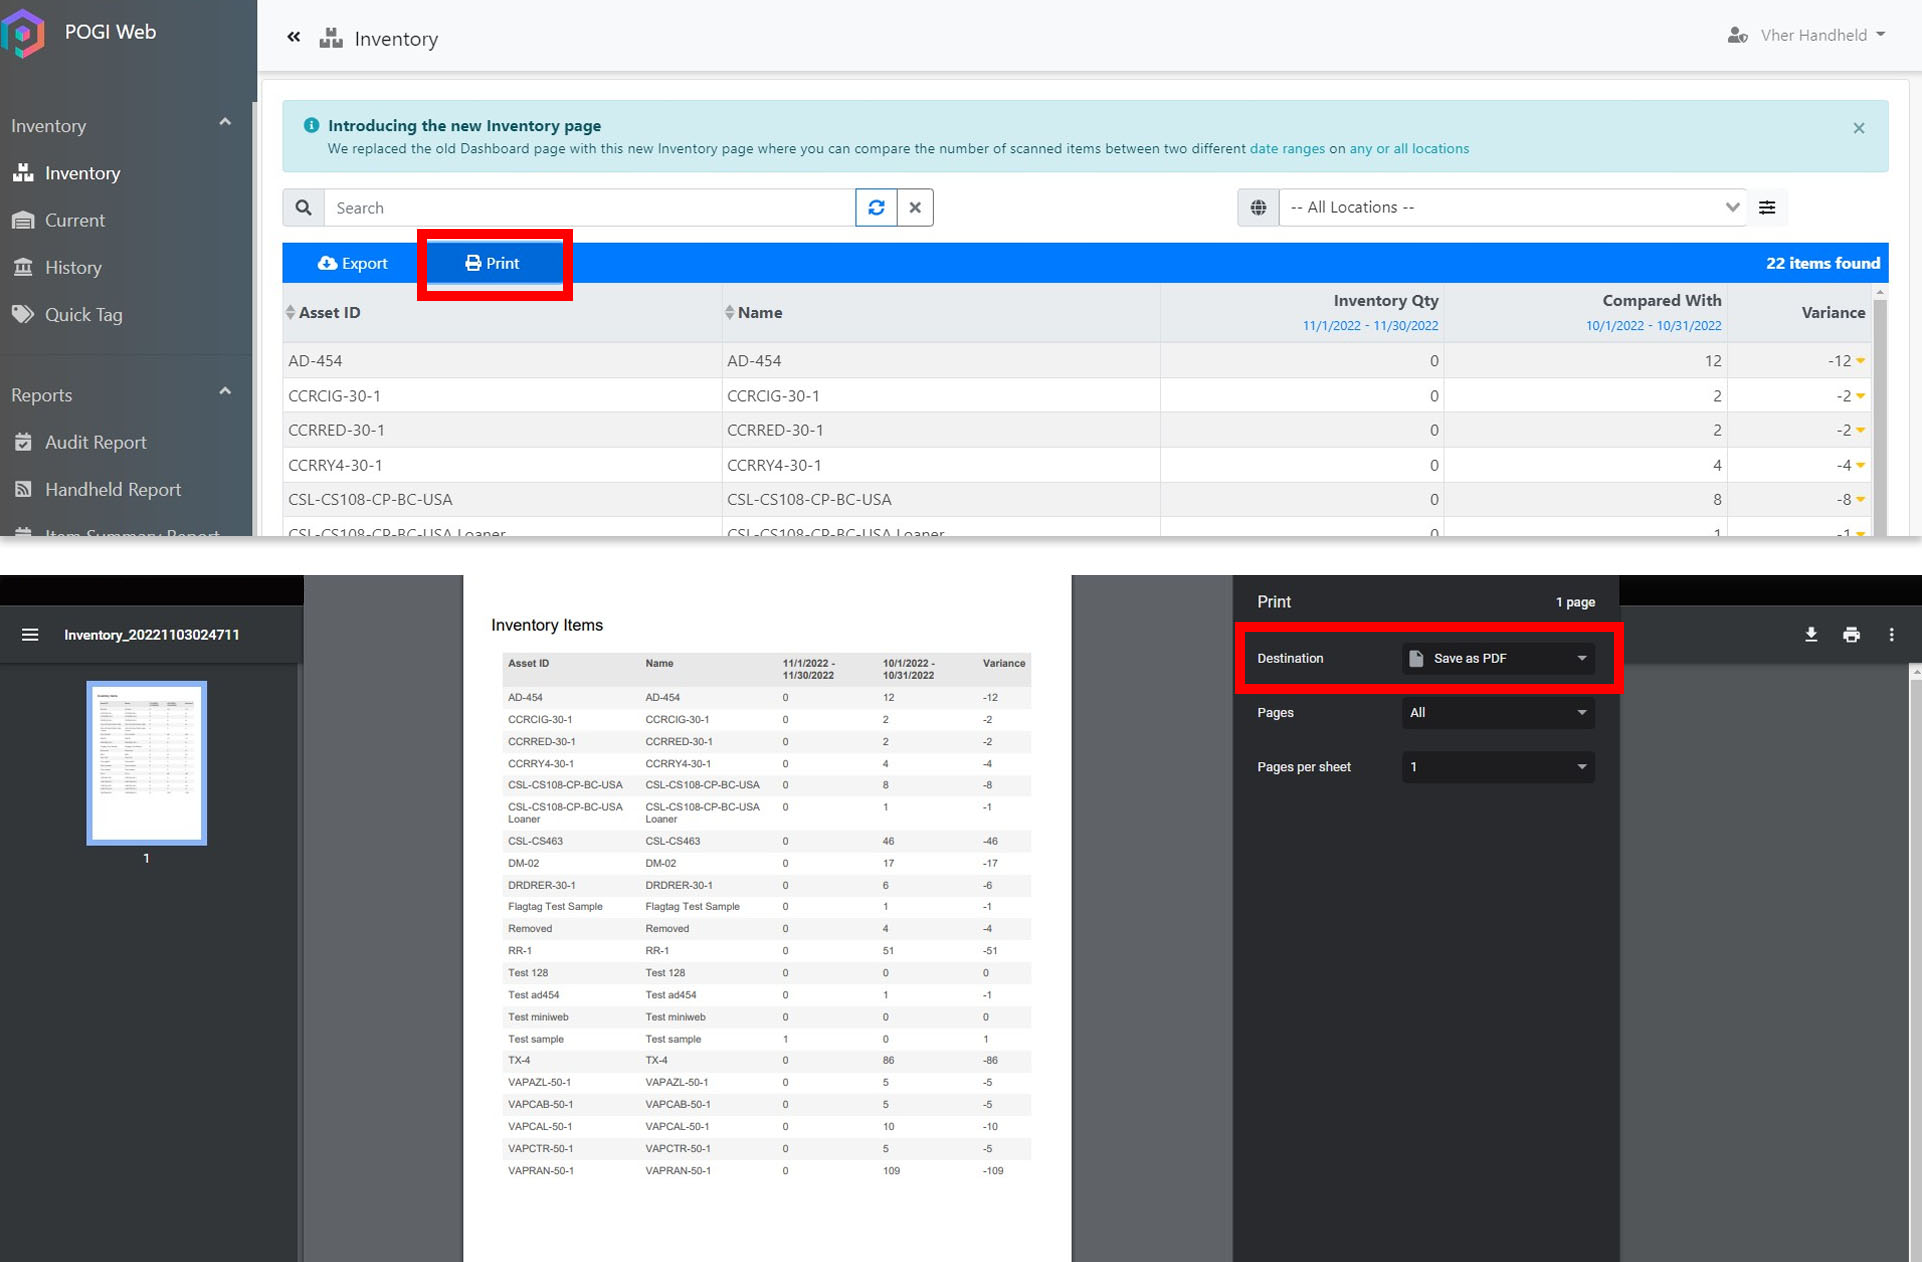
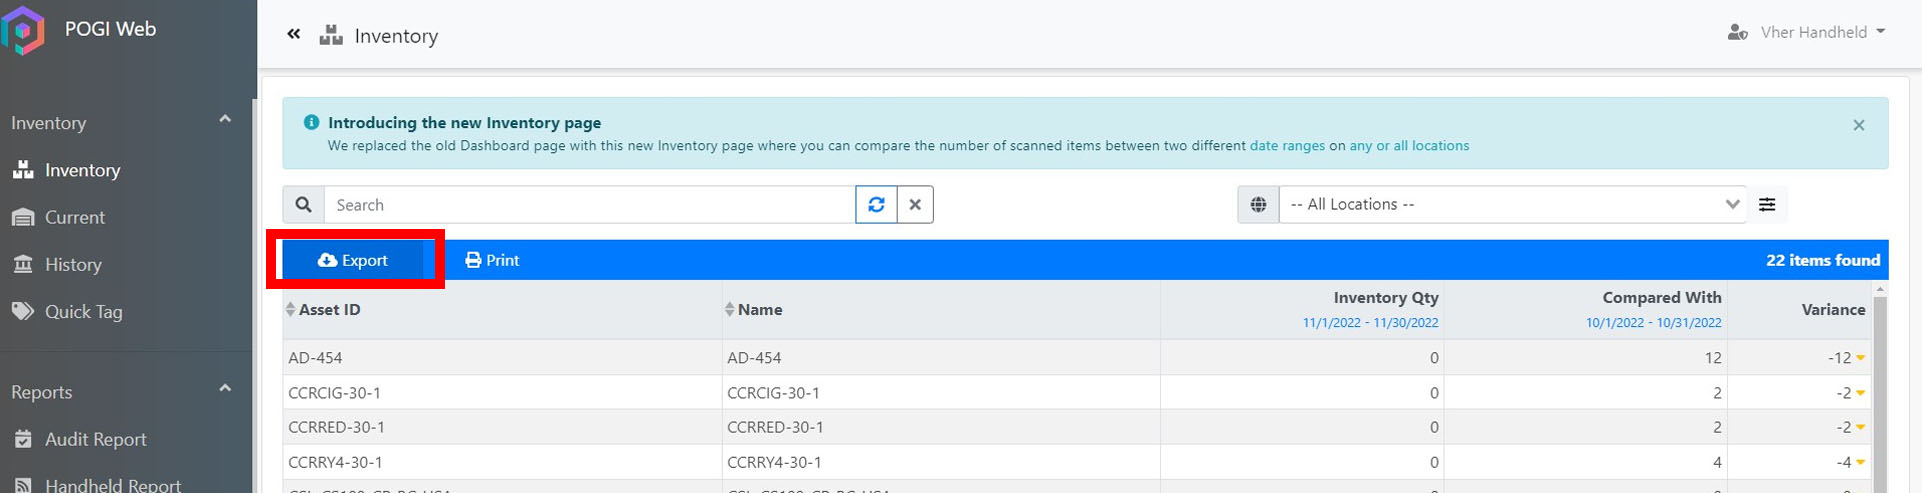
To generate your variance report into a CSV file:
- Click Export.
- It will download a CSV file to your desktop. Use any spreadsheet application you’re familiar with.
How does the inventory page determine your inventory quantities?
You might wonder why your Current page count has some discrepancy compared to the Inventory page's count. The Inventory page counts the items that were found present at least once during the time period selected --- whether or not these items are present during the present time.
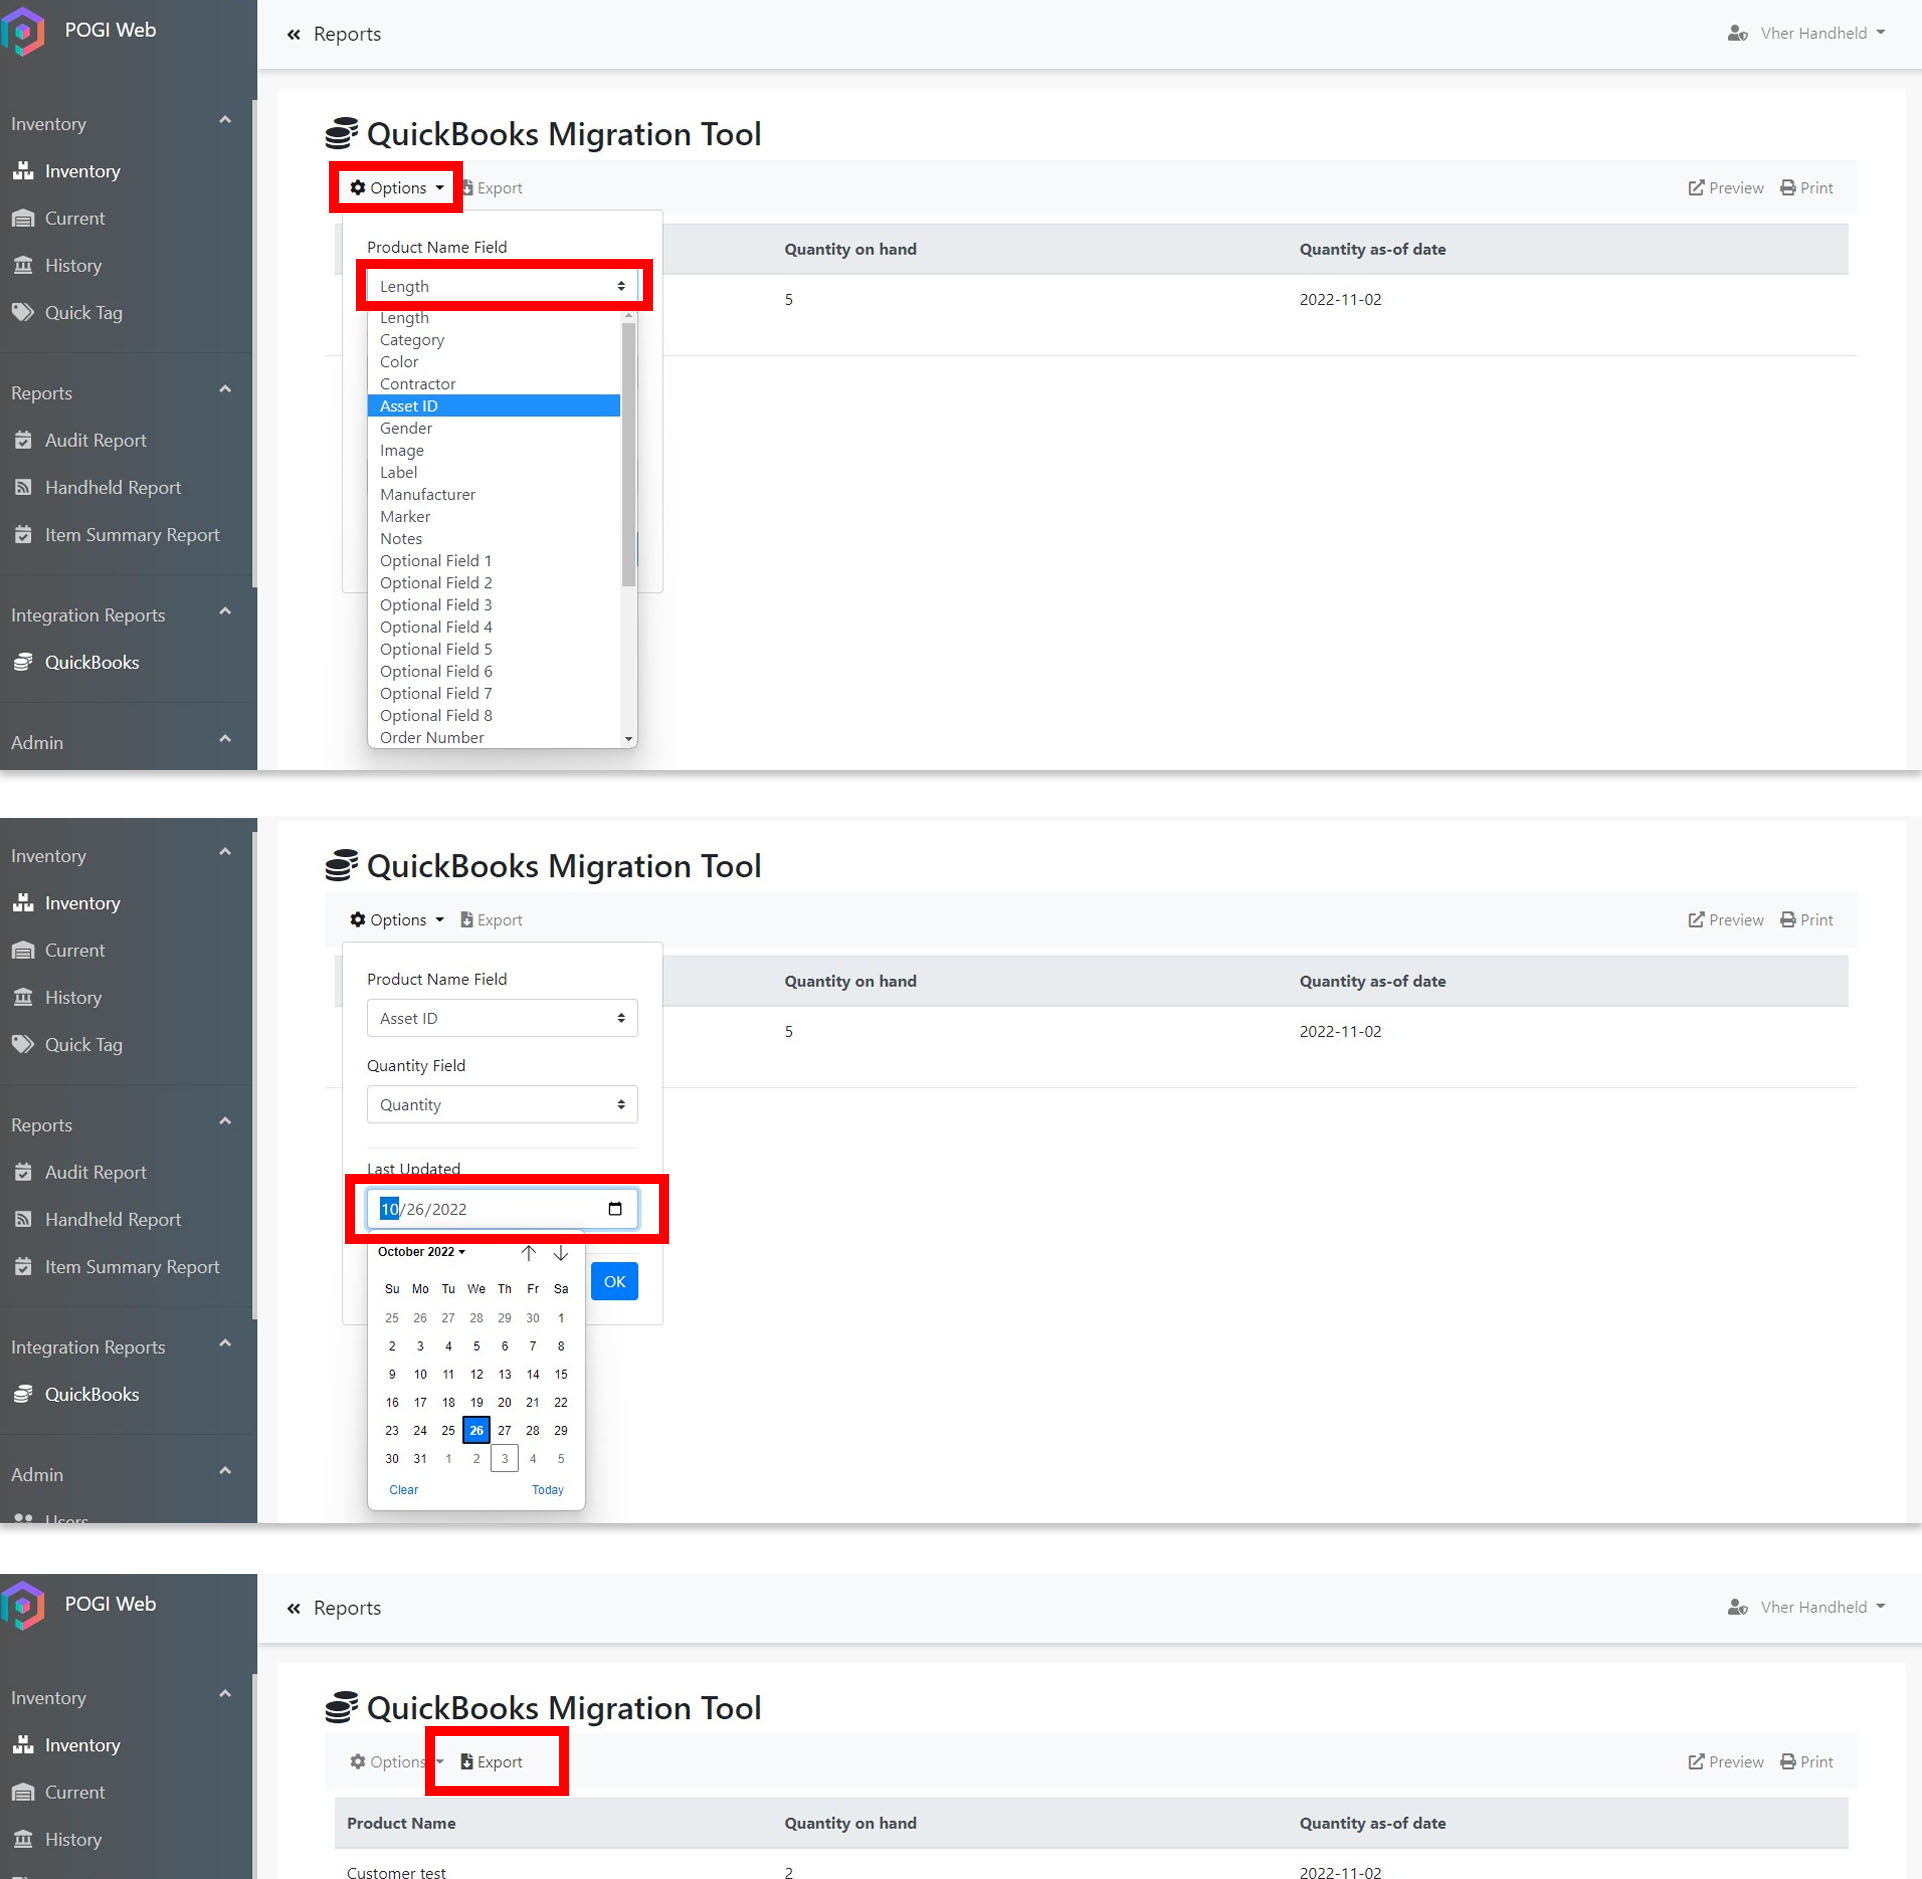
Updating the parts list with the current stock levels

With all of your items commissioned, we can now integrate this information into your ERP software. You can do one of two ways to integrate the data from Pogi into your ERP, Accounting, or POS software. Remember, that this will heavily rely on your software’s accessibility in terms of receiving information.
Exporting your inventory from Pogi

Some software, like Quickbooks, can easily accept your audited inventory by just uploading a CSV file. Should your software have this option, follow these steps below:
- Launch Pogi.
- Navigate to QuickBooks.
- On the upper left hand corner, click on Options. Select Asset ID as the Product Name field. Select the last update date you want to use as your stock level update date.
- Click Export.
- Upload the CSV file to QuickBooks.

In the ever-changing world of inventory management, the focus is on improving efficiency. Big or small companies don’t stop to find ways to be as efficient as possible out of their existing resources while adapting to new technologies that can improve their performance. Radio Frequency Identification (RFID), is a versatile technology that has great potential to transform the Inventory Management Industry.
Omnichannel retailing combines physical and online commerce. Buy Online and Pick-up in Store (BOPIS) and Buy Online and Return in Store (BORIS) are omnichannel solutions that have emerged due to change in buyer’s behavior. Accurate inventory tracking is important to achieve success in these omnichannel solutions. To compete with online retailers like Amazon, a solid inventory management system and process with the use of RFID tags is reliable to allow retailers to have easy access to all critical details of inventory like stock level, delivery information and location. The use of RFID tags is a key to seamless omnichannel experience.
On different Inventory Management Techniques, RFID has made it possible to achieve an accurate and fast result. The ABC Analysis technique, which ranks the item based on their importance or value in the business can now be optimized with the use of RFID tags.You can accurately scan 100% of your inventory across all groups, this is beyond the 80-20 principle that is usually used in this technique. Now, your total inventory has been given attention, not just the high-valued ones.
The Dropshipping technique allows the businesses to sell the products to their customers without the need to stock and send the items themselves. This is primarily used by online retailers in eCommerce like Shopify and BigCommerce. The process starts when a retailer receives orders from the shop front, which are then forwarded to the supplier for shipping. With the use of RFID tags on suppliers’ inventory, it is easy to know stock availability and its location. Shipment to customers will be faster.
For the Consignment Inventory technique, the product ownership is with the vendor or supplier until the product is sold by the retailer (consignee). This technique reduces the retailer’s risk until the product is sold. Having an accurate inventory is very crucial to monitor the stock level and trigger replenishment. These RFID tags can greatly help the operation to maximize sales through a fast reordering process.
Everytime items on inventory are touched or moved there is potential for inventory data to become inaccurate; and every action taken to resolve will require resources. But with the use of RFID tags, inventory movement can be tracked and traced; and missing items can be located as well. Thus, it saves money and time!
Your inventory is the backbone of your cash flow. With RFID tags, you can fully and efficiently take control of your inventory. Nowadays, greater standardization and reduced costs have made RFID a good choice for many businesses and will surely set your business apart from others.
WHY RFID? It will take care of your million dollar inventory. It provides efficient and accurate solutions to inventory management challenges, showing increased value in inventory which results also in the company's increase of revenue.
Start your journey with RFID and enjoy the benefits of having accurate inventory.